Difference between revisions of "Multiplayer Getting Started Guide"
m (recieve --> receive) |
m (seperate --> separata and Freespace --> FreeSpace) |
||
| Line 1: | Line 1: | ||
| − | This detailed step-by-step guide will help you set up a current installation of | + | This detailed step-by-step guide will help you set up a current installation of FreeSpace Open for online multiplayer gaming, either on FS2NetD or through a direct IP connection. The guide is aimed at those who have little to no experience with FreeSpace Open and covers everything that might be needed to get multiplayer up and running, so more experienced users may want to just read the headlines to make sure they don't forget an important step. |
==Pre-Game Preparation== | ==Pre-Game Preparation== | ||
| Line 23: | Line 23: | ||
*'''Step 4:''' Two mails have now been sent to the address you provided, one containing your login information (may want to write this down) and one containing an activation link. Open the one titled '''FS2NET Registration Authorization for: *****''', then follow the link inside to activate your FS2NetD account. | *'''Step 4:''' Two mails have now been sent to the address you provided, one containing your login information (may want to write this down) and one containing an activation link. Open the one titled '''FS2NET Registration Authorization for: *****''', then follow the link inside to activate your FS2NetD account. | ||
| − | ''Note: A pilot registered with FS2NetD can be used with all supported mods. It is not necessary to register | + | ''Note: A pilot registered with FS2NetD can be used with all supported mods. It is not necessary to register separate pilots for FreeSpace, Beyond the Red Line and Wing Commander Saga, though you do have the option of doing so.'' |
===Firewall/Router Setup=== | ===Firewall/Router Setup=== | ||
| − | As | + | As FreeSpace Open uses port 7808 for multiplayer games, it is necessary to allow communication on this port to pass through your firewall and, if applicable, router unhindered. To do this, call up the control panel for your firewall/router and add an rule that opens up port 7808 to both ingoing and outgoing traffic, for both the TCP and UDP protocols. Detailed walkthroughs of how to do this for some common firewalls and routers can be found in the [[Port Forwarding]] article, so consult that if you have trouble figuring out how to do it. |
Failure to do this will make you unable to host games, though depending on circumstances you may still be able to join games hosted by others. | Failure to do this will make you unable to host games, though depending on circumstances you may still be able to join games hosted by others. | ||
| Line 33: | Line 33: | ||
===Config File Setup=== | ===Config File Setup=== | ||
| − | + | FreeSspace Open relies on a config file to tell it the location of the FS2NetD server, and depending on how you acquired the game this file may not be present. If you downloaded the game using Turey's [http://www.hard-light.net/forums/index.php/topic,42854.0.html Online Installer], or used the official installers to get either [[Beyond the Red Line]] or [[Wing Commander Saga]], then you will already have a correct version of this file appropriate to your installation and can skip this step. Otherwise, proceed. | |
| − | The file in question, called <tt>fs2open_pxo.cfg</tt>, should be located in the /data/ folder under your | + | The file in question, called <tt>fs2open_pxo.cfg</tt>, should be located in the /data/ folder under your FreeSpace installation directory and should contain the following two lines depending on what you have installed: |
| − | Standard | + | Standard FreeSpace Open installation: |
fs2netd.game-warden.com | fs2netd.game-warden.com | ||
12000 | 12000 | ||
| Line 53: | Line 53: | ||
''Note: The current IP address of fs2netd.game-warden.com is'' <tt>64.92.160.250</tt>'', so if the first line says that instead then it will still work. However, using the URL is safer in case the IP address changes.'' | ''Note: The current IP address of fs2netd.game-warden.com is'' <tt>64.92.160.250</tt>'', so if the first line says that instead then it will still work. However, using the URL is safer in case the IP address changes.'' | ||
| − | ''Note: For those using the [[MediaVP]]s with a standard | + | ''Note: For those using the [[MediaVP]]s with a standard FreeSpace Open installation, a version of this file containing the same two lines may also be found in /mediavps/data/.'' |
===Getting the Validated Missions=== | ===Getting the Validated Missions=== | ||
| − | As the next step before moving in-game, you should download the multiplayer mission package. This package contains extra multiplayer missions for | + | As the next step before moving in-game, you should download the multiplayer mission package. This package contains extra multiplayer missions for FreeSpace 2, all of which are validated for online play over FS2NetD. This means that stats from these missions will be saved by the FS2NetD server after each game. |
| − | To use them properly, first download the <tt>multi-mission-pack.vp</tt> file (''link below'') and save it to a | + | To use them properly, first download the <tt>multi-mission-pack.vp</tt> file (''link below'') and save it to a separate directory under your FreeSpace 2 installation - For the purposes of this guide, we will use the directory '''<tt><FreeSpace 2 location>/multimissions/</tt>'''. Then select that directory as a mod in the launcher (''see next section''). There is also an optional voice pack addon for those missions which, if you choose to download it, should be placed in the same directory as the mission package. |
*[http://www.fszmirror.com/files/multi-mission-pack.vp Mission package] | *[http://www.fszmirror.com/files/multi-mission-pack.vp Mission package] | ||
| Line 64: | Line 64: | ||
===Launcher Setup=== | ===Launcher Setup=== | ||
Before being able to play online, your internet connection must be correctly configured in the launcher. To do that, follow the steps below: | Before being able to play online, your internet connection must be correctly configured in the launcher. To do that, follow the steps below: | ||
| − | [[Image:Launcher_network.JPG|frame|Network tab in the | + | [[Image:Launcher_network.JPG|frame|Network tab in the FreeSpace Open launcher|left]] |
| − | *'''Step 1:''' Start the | + | *'''Step 1:''' Start the FreeSpace Open launcher and go to the '''Network''' tab (''pictured left''). |
| Line 99: | Line 99: | ||
| − | [[Image:Pilot_select_multi.JPG|frame|Pilot selection screen in standard | + | [[Image:Pilot_select_multi.JPG|frame|Pilot selection screen in standard FreeSpace|right]] |
*'''Step 1:''' Start the game using the launcher, and you will arrive at the pilot selection screen (''pictured right''). | *'''Step 1:''' Start the game using the launcher, and you will arrive at the pilot selection screen (''pictured right''). | ||
| Line 109: | Line 109: | ||
| − | *'''Step 4:''' Type in the pilot name you used when you [[Multiplayer Getting Started Guide#FS2NetD Account Registration|registered your FS2NetD account]], and hit enter to create the pilot. It is not a problem if this name is the same as one of your singleplayer pilots, as they are stored | + | *'''Step 4:''' Type in the pilot name you used when you [[Multiplayer Getting Started Guide#FS2NetD Account Registration|registered your FS2NetD account]], and hit enter to create the pilot. It is not a problem if this name is the same as one of your singleplayer pilots, as they are stored separately. |
| Line 263: | Line 263: | ||
| − | Once you have looked over the available information and decided on which game to join, simply click on the game in the server list, and then click the '''Join''' button in the bottom-right of the lobby screen (''shown to the right''), and you will enter the game. Once you are in a game, you can chat with the other participants and ask any questions you might have regarding the game you have entered. Congratulations, you are now playing a | + | Once you have looked over the available information and decided on which game to join, simply click on the game in the server list, and then click the '''Join''' button in the bottom-right of the lobby screen (''shown to the right''), and you will enter the game. Once you are in a game, you can chat with the other participants and ask any questions you might have regarding the game you have entered. Congratulations, you are now playing a FreeSpace Open multiplayer game. |
Once the game enters briefing, it is much the same as in a regular single player mission. The main difference is that you can still chat with the other players while watching the briefing, and you will have to wait for all players to commit to the mission before the mission enters flight mode. | Once the game enters briefing, it is much the same as in a regular single player mission. The main difference is that you can still chat with the other players while watching the briefing, and you will have to wait for all players to commit to the mission before the mission enters flight mode. | ||
[[Category:Multiplayer]] | [[Category:Multiplayer]] | ||
Revision as of 16:28, 22 December 2008
This detailed step-by-step guide will help you set up a current installation of FreeSpace Open for online multiplayer gaming, either on FS2NetD or through a direct IP connection. The guide is aimed at those who have little to no experience with FreeSpace Open and covers everything that might be needed to get multiplayer up and running, so more experienced users may want to just read the headlines to make sure they don't forget an important step.
Pre-Game Preparation
Before starting the actual game, there are a few outside factors that need to be taken care of first:
FS2NetD Account Registration
The first thing to do is to register your multiplayer account with FS2NetD. To do that, follow the steps below.
Note: If you do not intend to play on FS2NetD, this step can be safely skipped as registration is not required for IP play, but registering is recommended nonetheless in case you change your mind.
- Step 1: Go to the FS2NetD website, found here: FS2NetD Home
- Step 2: Click the Register button (highlighted in image on the left) in the login box on the top-left of the page. This brings you to the registration screen for new users. Do not write anything in the two boxes for Pilot and Password, those are for users who have already signed up.
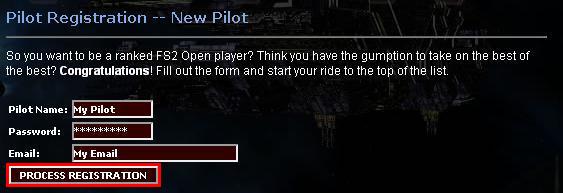
- Step 3: You now have 3 fields to fill out, as shown in the image to the right.
In the Pilot Name field, write the name of the pilot you intend to use when playing on FS2NetD.
In the Password field, write a password of your choice. As always with passwords, it is a good idea to use one that is difficult to guess - If you need tips on that, here is a quick guide: Choosing a Good Password. It would also be a very bad idea to reuse an existing password that is already being used for something sensitive.
Then, in the Email field, put in a valid E-mail address. Upon completion of registration, a confirmation email will be sent to this address with a link you must follow to active your account, so do not put in a bogus address. If you do not wish to give up your usual email address, then you can use a web-based email service instead - As long as you can receive the mail and follow the link, you're good to go.
Finally, click the Process Registration button (highlighted in image to the right).
- Step 4: Two mails have now been sent to the address you provided, one containing your login information (may want to write this down) and one containing an activation link. Open the one titled FS2NET Registration Authorization for: *****, then follow the link inside to activate your FS2NetD account.
Note: A pilot registered with FS2NetD can be used with all supported mods. It is not necessary to register separate pilots for FreeSpace, Beyond the Red Line and Wing Commander Saga, though you do have the option of doing so.
Firewall/Router Setup
As FreeSpace Open uses port 7808 for multiplayer games, it is necessary to allow communication on this port to pass through your firewall and, if applicable, router unhindered. To do this, call up the control panel for your firewall/router and add an rule that opens up port 7808 to both ingoing and outgoing traffic, for both the TCP and UDP protocols. Detailed walkthroughs of how to do this for some common firewalls and routers can be found in the Port Forwarding article, so consult that if you have trouble figuring out how to do it.
Failure to do this will make you unable to host games, though depending on circumstances you may still be able to join games hosted by others.
Config File Setup
FreeSspace Open relies on a config file to tell it the location of the FS2NetD server, and depending on how you acquired the game this file may not be present. If you downloaded the game using Turey's Online Installer, or used the official installers to get either Beyond the Red Line or Wing Commander Saga, then you will already have a correct version of this file appropriate to your installation and can skip this step. Otherwise, proceed.
The file in question, called fs2open_pxo.cfg, should be located in the /data/ folder under your FreeSpace installation directory and should contain the following two lines depending on what you have installed:
Standard FreeSpace Open installation:
fs2netd.game-warden.com
12000
Beyond the Red Line installation:
fs2netd.game-warden.com
12001
Wing Commander Saga installation:
fs2netd.game-warden.com
12003
The Babylon Project installation:
fs2netd.game-warden.com
12004
If this file is not present, or does not contain the exact lines above, then create a new text file in the /data/ folder, copy the appropriate lines to it, and save it as fs2open_pxo.cfg.
Note: The current IP address of fs2netd.game-warden.com is 64.92.160.250, so if the first line says that instead then it will still work. However, using the URL is safer in case the IP address changes.
Note: For those using the MediaVPs with a standard FreeSpace Open installation, a version of this file containing the same two lines may also be found in /mediavps/data/.
Getting the Validated Missions
As the next step before moving in-game, you should download the multiplayer mission package. This package contains extra multiplayer missions for FreeSpace 2, all of which are validated for online play over FS2NetD. This means that stats from these missions will be saved by the FS2NetD server after each game.
To use them properly, first download the multi-mission-pack.vp file (link below) and save it to a separate directory under your FreeSpace 2 installation - For the purposes of this guide, we will use the directory <FreeSpace 2 location>/multimissions/. Then select that directory as a mod in the launcher (see next section). There is also an optional voice pack addon for those missions which, if you choose to download it, should be placed in the same directory as the mission package.
Launcher Setup
Before being able to play online, your internet connection must be correctly configured in the launcher. To do that, follow the steps below:
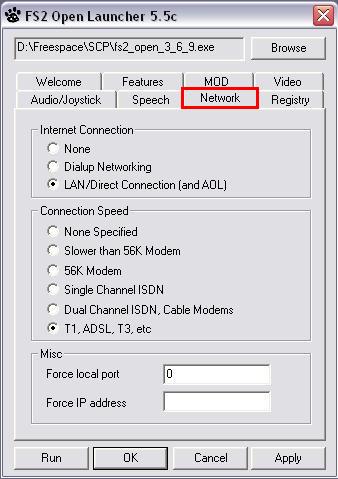
- Step 1: Start the FreeSpace Open launcher and go to the Network tab (pictured left).
- Step 2: In the Internet Connection field, choose Dialup Networking if you are using a standard or ISDN modem to connect to the internet. If you are using broadband connection such ADSL, Cable or (heavens forbid) a Fiber-Optic connection, choose the LAN/Direct Connection (And AOL) option.
- Step 3: In the Connection Speed field, simply choose the option that best fits your connection. Note that faster cable connections may belong in the T1, ADSL, T3, etc category as speeds have been upped significantly over the last few years.
Note, do not put anything into the Force local port or Force IP address fields at the bottom of the Network tab. Leave them as is. Doing otherwise can make it impossible for you to connect to FS2NetD.
- Step 4: Now go to the MOD tab (just above the highlighted Network tab in the image).
- Step 5: In the MOD tab, click the Select MOD button, select the multimissions folder from the list that
pops up, and click OK.
- Step 6: Click Apply at the bottom-right of the launcher to save the settings.
In-Game Preparation
With the above preparations taken care of, there are still a few in-game things to take care of.
Creating a Multiplayer Pilot
The first thing to do is to create a multiplayer pilot, by following these steps:
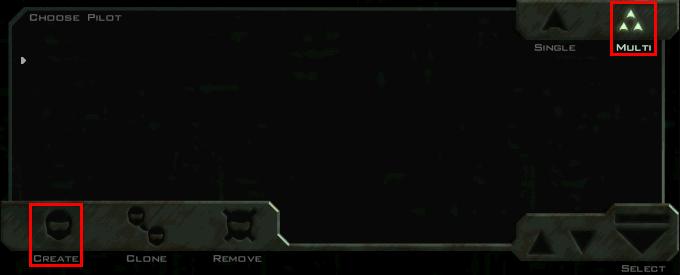
- Step 1: Start the game using the launcher, and you will arrive at the pilot selection screen (pictured right).
- Step 2: Click on the Multi button in the top-right corner (highlighted) to go to the multiplayer pilot screen.
- Step 3: Click on the Create button in the bottom-left corner (highlighted) as when creating a normal pilot. However, since we are now on the multiplayer screen, it will create a multiplayer pilot instead.
- Step 4: Type in the pilot name you used when you registered your FS2NetD account, and hit enter to create the pilot. It is not a problem if this name is the same as one of your singleplayer pilots, as they are stored separately.
- Step 5: Select the pilot by clicking the name, and click Select to enter the game.
Note: If you can't remember the pilot name you used when you registered, check your email - Upon registration, an email titled FS2NET Login Information For: ***** is sent to the email address you provided. The name in the title (here replaced with asterisks) is the pilot name you need.
Multiplayer Setup
Once in the game, go to the options screen (F2), then click on the Multi button (highlighted in image) in the top navigation bar. Here there are a number of settings to go over, some which vary depending on whether you want to play FS2NetD games or IP games, and some which apply to both.
Global Settings
These settings apply to both IP and FS2NetD games.
- Protocol Selection: These two buttons, found in the upper-left corner of the options screen, determine the network protocol used by the game to communicate with other machines. Set this to TCP as shown in the image to the left. The IPX protocol, while once popular, is no longer widely used and has been superceded by TCP in practically all areas, so unless specifically instructed otherwise, always leave this setting on TCP.
- Multidata: This button, found in the middle-left of the options screen, currently has no effect. Leave if Off as shown in the image to the left.
- Object Update: These four buttons, found in the upper-right part of the options screen, determine the rate at which your machine receives updates on objects in a mission. Most of the time, you will want to leave this on Low (as shown in the image to the right), as it can cause severe stress for a server if everyone in a game has this set to High, which in turn causes lag. So while it may seem counterintuitive, having updates set to Low does in fact make for a better multiplayer experience.
There is one exception to this - When you are hosting a game. In this case, and in this case only, set object update to High. Just remember to set it back to Low once you are done playing host.
- Pilot/Squad Images: These buttons, in the middle-right of the options screen, determine whether you will automatically download any pilot and squadron images used by other players when you connect to a server, if you don't already have them. The recommended setting is Yes as shown in the image to the right, but it is up to you whether you want to download them or not.
- Transfer Missions: These two buttons, in the middle-right part of the options screen, determine the location to which auto-transferred missions are saved. Always leave it on /Missions as shown in the image to the right, as selecting /Multidata can currently leave you unable to play the missions that are automatically transferred.
- Cache Flush: These buttons, in the lower-right part of the options screen, determine when the multiplayer cache will be cleared. With the size of today's harddrives, it is best to simply leave this on Never as shown in the image to the right, as it may cut waiting times a little when joining a game with people you have played with before.
FS2NetD Specific Settings
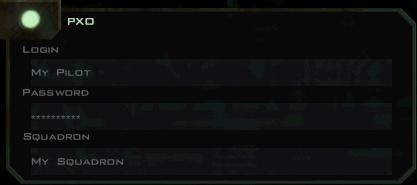
These settings apply only when you want to play games over the FS2NetD service. In the PXO Login box, found at the bottom-left area of the options screen and pictured below, you need to type in the information you used when you registered your FS2NetD account:
- First, make sure the PXO button in the top-left of the login box is turned on.
- In the Login field, write the name of the FS2NetD multiplayer pilot you are currently using.
- In the Password field, write the password you used when you registered that pilot.
- Finally, if you have joined a multiplayer squadron, type the name of that squadron in the Squadron field. This last field is optional, so it is OK to leave it blank for those who are not in a squadron.
With this done, you will automatically enter the multiplayer lobby when you click on the Ready Room from the main hall, and see any FS2NetD games that are currently running.
Note: If you can't remember the pilot name or password you used when you registered, check your email - Upon registration, an email titled FS2NET Login Information For: ***** is sent to the email address you provided. This email contains both the name and the password you need for your FS2NetD login.
Direct IP Specific Settings
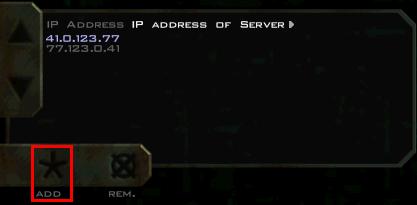
These settings only apply when you want to play games using a direct IP connection to the host computer. To do this, you need to first enter the IP address of the server you want to join and then turn off PXO, as shown below.
Add an IP Address:
- First, click the Add button (highlighted), and a marker will appear after IP Address at the top of the box.
- Next, in the place where IP Address of Server appears in the image, type in the IP address of the computer hosting the game you want to join and hit enter, and the address will appear in the box below. You do not need to select the address after adding it.
Deselect PXO:
- To deselect PXO, simply turn off the PXO button in the PXO Login box, as shown to the left.
With this done, you will automatically enter the multiplayer lobby when you click on the Ready Room from the main hall, and see any games that are currently being hosted on servers whose IP address you have added.
Note: When hosting an IP game, you do not need to enter the IP addresses of the client machines. However, you will need to supply them with Your IP address so they can add you to their list. To find your IP address, you can either go to the Support section for the connection you are using to access the internet, or go to whatismyip.com to see it online.
A quick overview of the rest of the IP Addresses box:
- The two Up and Down arrows on the left of the box allow you to scroll it if you have added a lot of IP addresses.
- The Rem. button next to the Add button allows you to delete an IP address you no longer need. The address to be deleted is selected by clicking on it, after which it will be highlighted as shown with the first of the two addresses in the image above.
Joining a Game
Once all the different options are set up to your satisfaction, select your multiplayer pilot and enter the Ready Room (R). This takes you to the multiplayer lobby.
Lobby Screen
The first thing you will see when you enter the multiplayer lobby is the server list, which takes up the top two-thirds of the screen. If one or more games are running, as shown in the image above, you are presented with a number of facts about each game, sorted into columns - If no games are currently running, you will be treated to the message shown in the second image below. Here's what the information in each column means:
- Status: This represents the stage the game is currently at, and can be either Forming, Briefing, Playing, or Debriefing. You can only join games in the Forming stage.
- Server: The server column shows you several different things:
- The green symbols on the left indicate the type of game - One group of three arrows is Coop, two opposing groups of three arrows (see above image) is Team vs Team, and 4 single arrows pointing towards eachother is Dogfight.
- The green text next to the symbols shows the speed of host's internet connection.
- And finally, the grey/blue text to the right of that shows the name of the game and the mission chosen by the host.
- Players: The players column shows the number of players currently in the game.
- Ping: And finally, the ping column shows the quality of your connection to the host, measured by the response time in milliseconds.
At the bottom-left of the server list window is a button labelled Refresh (pictured left), which lets you refresh the server list to see if any new games have started since you logged into the lobby. Below that, you will find a text box containing a short description whichever mission the server you have selected is running, and on the left side of the list are scroll buttons in case more servers are running than the window can fit.
Once you have looked over the available information and decided on which game to join, simply click on the game in the server list, and then click the Join button in the bottom-right of the lobby screen (shown to the right), and you will enter the game. Once you are in a game, you can chat with the other participants and ask any questions you might have regarding the game you have entered. Congratulations, you are now playing a FreeSpace Open multiplayer game.
Once the game enters briefing, it is much the same as in a regular single player mission. The main difference is that you can still chat with the other players while watching the briefing, and you will have to wait for all players to commit to the mission before the mission enters flight mode.

