Difference between revisions of "PBR Workflow"
| (8 intermediate revisions by the same user not shown) | |||
| Line 3: | Line 3: | ||
==PBR Map Types== | ==PBR Map Types== | ||
===Albedo=== | ===Albedo=== | ||
| − | The Albedo map replaces the diffuse map and is denoted by the basename texture (XXX.dds). Albedo maps contain no lighting information, so you will not multiply your ambient occlusion map into it. | + | The Albedo map replaces the diffuse map and is denoted by the basename texture (XXX.dds). Albedo maps contain no lighting information, so you will not multiply your ambient occlusion map into it. The link at the top of this article states that metals should have a black diffuse/albedo. This is misleading because many metals actually have visibly gray diffuse colors. For example, Silver has a diffuse of (30,30,30), making it a dark gray, while Steel and Aluminum have even darker diffuse colors at (5,5,5) and (13,13,13) respectively. Additionally, some metals do have colored diffuse. Gold is a perfect example for this, as it has a diffuse color of (36,13,3). |
===Reflectance=== | ===Reflectance=== | ||
| − | The Reflectance map replaces the shine map and is denoted by the basename followed by the -reflect suffix (XXX-reflect.dds). Reflectance maps contain specular colors in the RGB channels and gloss information in the alpha channel. | + | The Reflectance map replaces the shine map and is denoted by the basename followed by the -reflect suffix (XXX-reflect.dds). Reflectance maps contain specular colors in the RGB channels and gloss information in the alpha channel. Any material can be glossy or matte, use gloss as you see fit, especially for scratches and buffs. Metals tend to have high, colored specular values, while dielectrics tend to have low, gray specular values. Some metals have different specular values depending upon the purity of the material or additional alloying materials (e.g. Vanadium Steel is different from High Carbon Steel). |
===Occlusion=== | ===Occlusion=== | ||
| − | The Occlusion map is a new addition and is denoted by the basename followed by the -ao suffix (XXX-ao.dds). The Occlusion map holds Ambient Occlusion in the red channel and Cavity Occlusion in the green channel with the blue and alpha channels remaining empty. | + | The Occlusion map is a new addition and is denoted by the basename followed by the -ao suffix (XXX-ao.dds). The Occlusion map holds Ambient Occlusion in the red channel and Cavity Occlusion in the green channel with the blue and alpha channels remaining empty. Ambient Occlusion is applied to ambient lighting while Cavity Occlusion is applied to the diffuse and specular lighting. |
| + | |||
| + | |||
| + | ==Making new maps== | ||
| + | Generally, creating new PBR textures is nearly identical to making them the old way, you just do it using physically accurate values for the Albedo and Reflectance maps. Additionally, there are a multitude of tools being released that enable automated creation of PBR assets. The examples I personally recommend are Quixel Suite, Marmoset Toolbag, and Substance Painter. Unfortunately, these tools are quite expensive, but you can actually use many of the techniques they implement in programs like GIMP and Photoshop. I'm going to be using Photoshop, but I will include the GIMP equivalent of a feature if required. | ||
| + | |||
| + | [[Image:PBR_Nu_01.png|thumb|right|100px|My project setup.]] | ||
| + | Before we start, you will need in your GIMP/PS project: Two folders name Albedo and Reflectance respectively, the AO map, the UV map, and any tiled textures you want to use to generate normals or mask into the albedo and reflectance. Additionally, It's important that you have knowledge of how the mask and channel editors work for you application of choice. | ||
| + | |||
| + | |||
| + | |||
| + | |||
| + | |||
| + | |||
| + | |||
| + | |||
| + | |||
| + | |||
| + | |||
| + | |||
| + | |||
| + | |||
| + | |||
| + | |||
| + | |||
| + | |||
==Converting Existing Maps== | ==Converting Existing Maps== | ||
| + | The same techniques apply to converting maps to PBR. | ||
===Albedo/Diffuse=== | ===Albedo/Diffuse=== | ||
[[Image:PBRTut01.png|thumb|right|200px|The albedo texture for the Medusa]] | [[Image:PBRTut01.png|thumb|right|200px|The albedo texture for the Medusa]] | ||
| − | So let’s jump right into the thick of things. In this tutorial, I’m going to be using Hades’ Medusa as the subject of a proper PBR makeover. As you can see, I removed the grime and oxidation features for the most part as it’s easiest to make a visually brand spanking new Medusa. Additionally, I’ve removed the Ambient Occlusion because it now has its own texture slot in FSO. This is based off the blue Medusa I showed off in the PBR thread | + | So let’s jump right into the thick of things. In this tutorial, I’m going to be using Hades’ Medusa as the subject of a proper PBR makeover. As you can see, I removed the grime and oxidation features for the most part as it’s easiest to make a visually brand spanking new Medusa. Additionally, I’ve removed the Ambient Occlusion because it now has its own texture slot in FSO. This is based off the blue Medusa I showed off in the PBR thread. Since FreeSpace takes place in outer space and the Medusa is a combat craft, I’ve elected to give it a uniformly rough surface which results in a very low gloss. After the basic albedo(diffuse) and specular maps have been created and tested, we’ll go ahead and give it some chipped paint and oxidation as if it had seen some hard years. Since the albedo is already finished, we just need to convert the shine map into a reflectance map. |
| Line 30: | Line 56: | ||
We'll start first by creating a mask so we can keep track of which parts are metal (White) and which parts are dielectric (black). We copy this over into the specular map file so we can start working there. We're going to simplify this a bit by assuming that all the different paint colors have the same specular color, all the metals have the same specular color, and finally, that the entire ship has a uniform glossiness. | We'll start first by creating a mask so we can keep track of which parts are metal (White) and which parts are dielectric (black). We copy this over into the specular map file so we can start working there. We're going to simplify this a bit by assuming that all the different paint colors have the same specular color, all the metals have the same specular color, and finally, that the entire ship has a uniform glossiness. | ||
| − | We'll start with the gloss part as it's very simple: Just change the alpha channel to a uniform color. I think that a value of 0.15 is a good starting point. Next we'll | + | We'll start with the gloss part as it's very simple: Just change the alpha channel to a uniform color. I think that a value of 0.15 is a good starting point. Next, we'll say that the specular value for the painted portions is around 0.2 as this is one of the commonly seen scanned values for paint. For the metallic portions, an RGB of (158,173,180) should do the trick. |
| Line 53: | Line 79: | ||
In the shaders, Ambient Occlusion is applied only to ambient lighting while Cavity Occlusion is applied to the diffuse and specular lighting. | In the shaders, Ambient Occlusion is applied only to ambient lighting while Cavity Occlusion is applied to the diffuse and specular lighting. | ||
| + | Note: An actual Cavity Occlusion map sometimes is difficult to get, especially one that looks good, so a decent alternative is to copy the Ambient Occlusion into the green channel as well. | ||
| Line 58: | Line 85: | ||
| − | |||
| − | |||
| − | |||
| − | |||
[[Category:Tutorials]] | [[Category:Tutorials]] | ||
Latest revision as of 23:15, 22 September 2016
It is recommended that you read the Physically Based Rendering Encyclopedia before examining this document as it covers the theory behind PBR. While not required, it does cover more complex topics that may assist you in creating your assets by hand.
Contents
PBR Map Types
Albedo
The Albedo map replaces the diffuse map and is denoted by the basename texture (XXX.dds). Albedo maps contain no lighting information, so you will not multiply your ambient occlusion map into it. The link at the top of this article states that metals should have a black diffuse/albedo. This is misleading because many metals actually have visibly gray diffuse colors. For example, Silver has a diffuse of (30,30,30), making it a dark gray, while Steel and Aluminum have even darker diffuse colors at (5,5,5) and (13,13,13) respectively. Additionally, some metals do have colored diffuse. Gold is a perfect example for this, as it has a diffuse color of (36,13,3).
Reflectance
The Reflectance map replaces the shine map and is denoted by the basename followed by the -reflect suffix (XXX-reflect.dds). Reflectance maps contain specular colors in the RGB channels and gloss information in the alpha channel. Any material can be glossy or matte, use gloss as you see fit, especially for scratches and buffs. Metals tend to have high, colored specular values, while dielectrics tend to have low, gray specular values. Some metals have different specular values depending upon the purity of the material or additional alloying materials (e.g. Vanadium Steel is different from High Carbon Steel).
Occlusion
The Occlusion map is a new addition and is denoted by the basename followed by the -ao suffix (XXX-ao.dds). The Occlusion map holds Ambient Occlusion in the red channel and Cavity Occlusion in the green channel with the blue and alpha channels remaining empty. Ambient Occlusion is applied to ambient lighting while Cavity Occlusion is applied to the diffuse and specular lighting.
Making new maps
Generally, creating new PBR textures is nearly identical to making them the old way, you just do it using physically accurate values for the Albedo and Reflectance maps. Additionally, there are a multitude of tools being released that enable automated creation of PBR assets. The examples I personally recommend are Quixel Suite, Marmoset Toolbag, and Substance Painter. Unfortunately, these tools are quite expensive, but you can actually use many of the techniques they implement in programs like GIMP and Photoshop. I'm going to be using Photoshop, but I will include the GIMP equivalent of a feature if required.
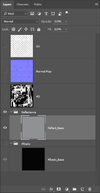
Before we start, you will need in your GIMP/PS project: Two folders name Albedo and Reflectance respectively, the AO map, the UV map, and any tiled textures you want to use to generate normals or mask into the albedo and reflectance. Additionally, It's important that you have knowledge of how the mask and channel editors work for you application of choice.
Converting Existing Maps
The same techniques apply to converting maps to PBR.
Albedo/Diffuse
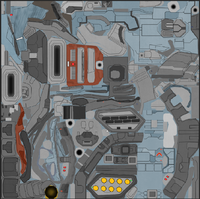
So let’s jump right into the thick of things. In this tutorial, I’m going to be using Hades’ Medusa as the subject of a proper PBR makeover. As you can see, I removed the grime and oxidation features for the most part as it’s easiest to make a visually brand spanking new Medusa. Additionally, I’ve removed the Ambient Occlusion because it now has its own texture slot in FSO. This is based off the blue Medusa I showed off in the PBR thread. Since FreeSpace takes place in outer space and the Medusa is a combat craft, I’ve elected to give it a uniformly rough surface which results in a very low gloss. After the basic albedo(diffuse) and specular maps have been created and tested, we’ll go ahead and give it some chipped paint and oxidation as if it had seen some hard years. Since the albedo is already finished, we just need to convert the shine map into a reflectance map.
Reflectance
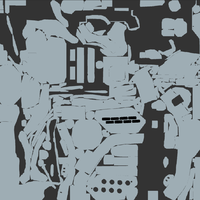
We'll start first by creating a mask so we can keep track of which parts are metal (White) and which parts are dielectric (black). We copy this over into the specular map file so we can start working there. We're going to simplify this a bit by assuming that all the different paint colors have the same specular color, all the metals have the same specular color, and finally, that the entire ship has a uniform glossiness.
We'll start with the gloss part as it's very simple: Just change the alpha channel to a uniform color. I think that a value of 0.15 is a good starting point. Next, we'll say that the specular value for the painted portions is around 0.2 as this is one of the commonly seen scanned values for paint. For the metallic portions, an RGB of (158,173,180) should do the trick.
Ambient and Cavity Occlusion
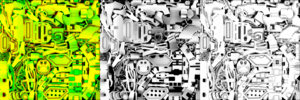
The -ao maps in FSO hold the information of two different map types, Ambient Occlusion (red channel) and Cavity Occlusion (green channel). Ambient Occlusion can be baked in Blender, Maya, or 3DS MAX, but Cavity Occlusion cannot. This is rather unfortunate as it leaves xNormal as one of the sole solutions and it isn't able to bake Cavity Occlusion maps using hardware, so be prepared for 20 minute to 2 hour bake times depending on the resolution of your maps and the accuracy of your settings.
As the AO maps in FSO now only use two of the four channels in an image, you can leave the blue and alpha channels alone when editing them. This also leads to some pretty funky looking textures...
In the shaders, Ambient Occlusion is applied only to ambient lighting while Cavity Occlusion is applied to the diffuse and specular lighting.
Note: An actual Cavity Occlusion map sometimes is difficult to get, especially one that looks good, so a decent alternative is to copy the Ambient Occlusion into the green channel as well.


