Difference between revisions of "Getting the FreeSpace2: SCP Source Code"
(→Unixes) |
SpaceFreak (talk | contribs) (→Windows: Suppose these pictures go here?) |
||
| Line 15: | Line 15: | ||
Here's how you set things up: | Here's how you set things up: | ||
| − | *Go to the [http://tortoisesvn. | + | *Go to the [http://tortoisesvn..or/ Tortoise SVN homepage] and download the latest version. |
*Install it. You'll probably have to restart your PC afterwards. | *Install it. You'll probably have to restart your PC afterwards. | ||
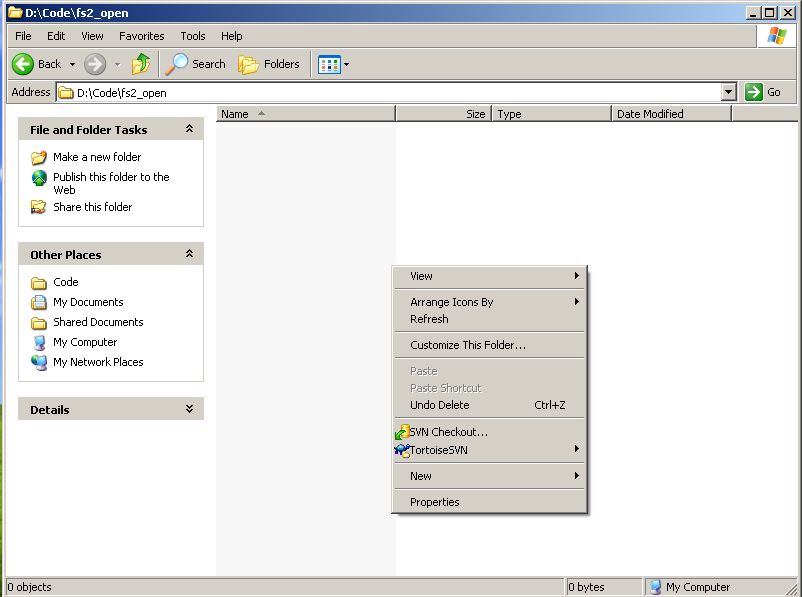
*Make a new folder on your HD where you'd like to install the code. You'll need a fair bit of space for the code + the intermediate files when building it. Press right mouse and choose SVN Checkout from the list. | *Make a new folder on your HD where you'd like to install the code. You'll need a fair bit of space for the code + the intermediate files when building it. Press right mouse and choose SVN Checkout from the list. | ||
| − | : | + | [[Image:CheckingOutSVN1.jpg]] |
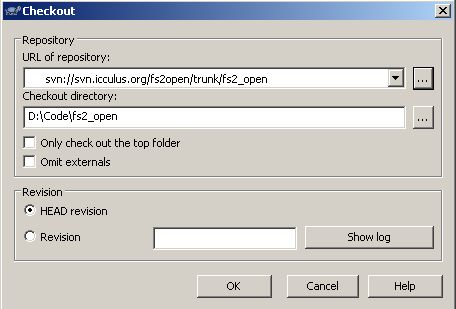
*An new window will open up. Cut and paste this into the URL of repository box:<br>'''svn://svn.icculus.org/fs2open/trunk/fs2_open''' | *An new window will open up. Cut and paste this into the URL of repository box:<br>'''svn://svn.icculus.org/fs2open/trunk/fs2_open''' | ||
*By default the HEAD revision will be selected. You probably don't want to change this. Your screen should now look like this: | *By default the HEAD revision will be selected. You probably don't want to change this. Your screen should now look like this: | ||
| − | : | + | [[Image:CheckingOutSVN2.jpg]] |
*Press OK to begin downloading from the repository. | *Press OK to begin downloading from the repository. | ||
Revision as of 19:19, 3 April 2013
IMPORTANT NOTES:
On March 2008, the SCP team has changed the repository server from CVS based to SVN based.
Some terms have also changed with the new repository server:
- The stable branch (old CVS) is now called Trunk (new SVN).
- HEAD revision (new SVN) is latest version. Do not confuse it with the unstable branch, also called HEAD branch, in old CVS.
Windows
Ported from karajorma's thread on the HLP Forums.
Here's how you set things up:
- Go to the Tortoise SVN homepage and download the latest version.
- Install it. You'll probably have to restart your PC afterwards.
- Make a new folder on your HD where you'd like to install the code. You'll need a fair bit of space for the code + the intermediate files when building it. Press right mouse and choose SVN Checkout from the list.
- An new window will open up. Cut and paste this into the URL of repository box:
svn://svn.icculus.org/fs2open/trunk/fs2_open - By default the HEAD revision will be selected. You probably don't want to change this. Your screen should now look like this:
- Press OK to begin downloading from the repository.
It's pretty easy. It shouldn't take you more than a minute or two to do once you've installed Tortoise.
Mac
Please see the Mac Development Guide.
Unixes
With a fresh Ubuntu 12.10 (latest) install, you will need to install the following packages. Other distributions will vary on which packages need to be installed on top of the base install.
- build-essential
- subversion
- autoconf
- automake
- libsdl1.2-dev
- libogg-dev
- libvorbis-dev
- libtheora-dev
- lua5.1
- liblua5.1-0-dev
- libjpeg-dev
To checkout the fs2_open repsoitory :
svn checkout svn://svn.icculus.org/fs2open/trunk/fs2_open
After checkout, autogen the makefiles
cd fs2_open
./autogen.sh
To build a debug build :
cd fs2_open
./autogen.sh --enable-debug
To build with custom CFLAGS :
cd fs2_open
./autogen.sh "CFLAGS={Your CFLAGS Here}"
Note that the quotes are required
Building with custom CFLAGS for machine specific binaries (such as -march=native -mtune=native), may be unstable and unsupported. Use at your own risk.
After makefile autogen is complete, run 'make' to actually build the executable. Use the -j option to compile faster. It causes make to use multiple cores instead of 1.
make -j 4
The number after '-j' should be the number of logical processors (physical + hyperthread)
After compiling completes, the executable is placed at $(FSO_BUILD_DIR)/code/fs2_open.M.m.vv (currently 3.6.19)
Copy this file to your fs2_open installation directory (your path will vary). You may need root permission to copy the file.
sudo cp ./code/fs2_open_3.6.19 /usr/share/games/freespace2

