Advanced Cutscene SEXP Reference
This "reference tutorial" is mostly going to show what the different cutscene sexps do. There's no real structure to this. Check out this cutscene tutorial by skullar or this one by TopAce for a more guided experience.
Contents
- 1 Cutscene Sexps
- 1.1 set/unset-cutscene-bars
- 1.2 fade-in/out
- 1.3 set-camera
- 1.4 set-camera-*
- 1.5 set-camera-fov + set/get-fov
- 1.6 reset-fov
- 1.7 reset-camera
- 1.8 show-subtitle-text
- 1.9 show-subtitle-image
- 1.10 clear-subtitles
- 1.11 lock-perspective
- 1.12 set-camera-shudder
- 1.13 supernova-start/stop
- 1.14 set-motion-debris-override
- 2 Non-Cutscene Sexps that are really useful
Cutscene Sexps
set/unset-cutscene-bars
Go for a completely cinematic style and add cutscene bars to the top and buttom of your screen. Doesn't change the field of view, just the aspect ratio.
fade-in/out
Ease scene transitions with by gradually fading the whole screen to a color. This used to be limited to just black, white and red, but now it accepts all 16 million colors in the RGB scheme. Just FYI, transition times are in milliseconds. Fade-out will gradually go to the color specified, and fade-in will go from the color specified to the current camera. You don't need to fade-out to fade-in if you need a sudden fade-in.
set-camera
Usually you can just get by with the single cutscene camera, but if you're really going for something complicated that demands several cameras working at once, you can use this to go to different cameras. If a camera doesn't exist, its created and you can always go back to it later.
set-camera-*
All set-camera-* sexps will also set the camera to be become the last cutscene camera used, which by default, will turn off the hud! The default settings for the camera are: Position: 0,0,0. Orientation: 0 pitch, 0 bank, 0 heading. No host. No target. Default field of view.
set-camera-position
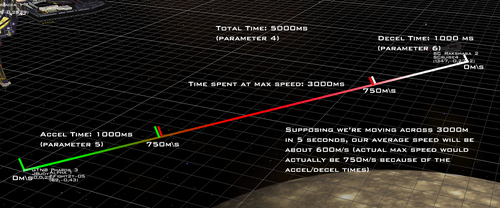
Sets the camera position. There are a few transition parameters you can use to move the camera. These are time based parameters. After specifying the desired location you can specify the time it should take to complete. You can also specify an acceleration time (time it takes to get up to speed) and a deceleration time (time it takes to slow down to zero). See image below for a rough idea how this works.

Specifying a position with get-object-position-xyz won't follow the ship. It will only move to the position that was at when the sexp started. (Though you could use repeating events to follow the ship, but we have other ways to do this).
And since sexps are evaluated from top to bottom, you can set up a initial position for a camera by set-camera-position with no transition time and then having another set-camera-position right under it with the final position plus the desired transition times.
If the acceleration/decceleration times are too large, relative to the total time desired, you may come up with unexpected results.
You can "interrupt" a camera's transition by giving it a new position or orientation even when its in the middle of a transistion. With the acceleration and deceleration parameters, you can mask any bumps that might occur in the interruptions and have a very seamless shot.
set-camera-facing + -object
Changes the camera's rotation so that it faces either a set of 3d coordinates, or a ship (+child subsystem). Again we've got transition parameters like the set-camera-position sexp.
And again, this won't track an object automatically if you use the -object version or tell it to look at get-object-position-xyz. It will only turn to face the coordinates where it was when the sexp began.
See below how this sexp can conflict with set-camera-rotation.
set-camera-rotation
Changes the camera's rotation to a set pitch/bank/heading orientation. Transition parameters are available.
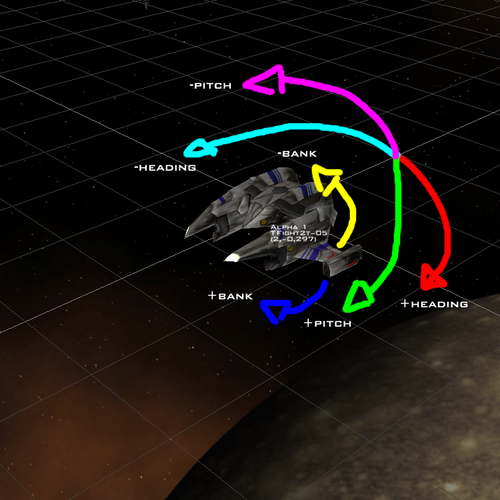
The axes for the camera are a little jumbled. See this picture for reference.
Basically its the reverse of what you would expect from the background editor. Weird, I know!
Set-camera-facing-* and set-camera-rotation both change the same characteristic in a camera (the camera's orientation), so they don't add. Telling the camera to look at -500,0,0 from 0,0,0 is the same as telling the camera to look at 0 pitch, 0 bank, -90 heading. And setting the camera to face the GTD Destroyer at 0,0,-5000 from 0,0,0 and then setting the rotation to 10 pitch, 0 bank, 0 heading will just cause the camera to look at 10 pitch, 0 bank, 0 heading.
And while we're at it, watch out for gimbal lock. If you set pitch to be 90 degrees, both heading and bank will become parallel to each other, which can cause unexpected results. See [this] video for an explanation on this. For reference in the torus example, the x-axis of rotation is our pitch (the red torus), the y-axis is our heading (the green torus) and the z-axis is our bank (the blue torus). FreeSpace appears to use the YXZ parenting structure demonstrated in the video.
The camera may seem to act odd when it has to cover more than 90 degrees of orientation. It especially gets bad if you were to tell it to rotate 180 degrees. The camera won't know which direction to actually spin, so it would just stay still during the duration and then suddenly change at the end. If you need a long spanning rotation, consider breaking it up into a few events.
set-camera-host
All camera coordinates become relative to the host. This means that 0,0,0 to the camera is now at the origin of the host. Setting host to the GTD Destroyer and setting the camera to 0,500,0 will cause the camera to /always/ be 500m above the destroyer, no matter how it moves. The orientation of the camera is also adjusted to match the host. You can use this to follow a ship without needing repeating events. A good way to think of it is the position becomes the offset from the host.
set-camera-target
Sets the default orientation for the camera to be pointed at the target. This means at 0 pitch, 0 bank, 0 heading, the camera will always point at the target. Setting target to Alpha 3 and setting the camera to 0 degrees pitch, 90 bank, and 0 heading will show Alpha 3 sideways. This is how you can track a target without needing to use repeating events to keep the camera on it.
Using set-camera-facing won't work properly with set-camera-target.
set-camera-fov + set/get-fov
set-camera-fov will only adjust the field of view of the camera. set/get-fov will adjust the default view field of view. Oddly enough only set-camera-fov has transition parameters...
reset-fov
Resets the field of view to the default.
reset-camera
Causes the camera to reset back to the default view. By default, the last camera settings are not erased. So setting camera position to 0,0,500 and facing 0,0,-90, then resetting the camera (going back to the default view), and setting host to GTD Destroyer, we will be 500m in front of the destroyer and looking to the left. Adding a true to the first parameter will reset the camera settings back to their defaults.
show-subtitle-text
Allows you to post subtitles on the screen. It either uses the text you type (limited to 32 characters), or the text of a message specified. There's a whole bunch of fun parameters that are mostly self explanatory. The positions are percent of the screen's height and width. Drawn after shading means that fade-in and fade-outs will not affect the subtitles.
show-subtitle-image
Pretty much the same thing as show-subtitle-text, just with images. Images must be TGA, JPG, DDS or (the very much preferred) PNG. The files must be in one of the following data directories: effects, hud, interface, maps.
clear-subtitles
Instantly clears all subtitles. Useful if you're using subtitles as a prompt for an action such as [Press $key$ to skip].
lock-perspective
If you need to move the player's viewpoint to a specific point (like forcing him inside the cockpit or chase view) you can use this.
set-camera-shudder
This causes the camera to shudder (like if you're using a maxim or in a shockwave) BUT it only works in the default view. Cutscene cameras are not affected.
supernova-start/stop
Don't like that star? Get rid of it. Start the supernova timer just like in FreeSpace's final mission. Had second thoughts about the star? Stop the supernova. (Aren't god-like powers grand?)
set-motion-debris-override
Add or remove those tiny rocks are give you an idea of your movement. It might be an idea to turn these off during cutscenes since you can pull off some "fake" movement with camera tricks, but stationary motion debris might spoil that.
Non-Cutscene Sexps that are really useful
hud-disable + hud-disable-except-messages
By default, the hud gets disabled when you move into cutscene mode and gets re-enabled when the camera is reset back to default view. But if you want to have messages be visible during a cutscene, you can use the hud-disable-except-messages sexp. The only catch is that you will need to manually re-enable the hud with hud-disable-except-messages. Using disable hud to re-enable the hud here won't work.
play/close-sound-from-file
Music man. It makes the cutscene go from cool to amaaaazing.
adjust-audio-volume
Control the audio channels with this. Kill all sounds, fade in your music, quiet the voices. This has transition parameters.
player-use-ai + lock-primary-weapons + etc
Its probably a good idea to use player-use-ai and tell it to play dead (with add-goal) with 100+ priority and throw it far far away. As well as locking ETS, weapons and afterburner. That way you won't die to errant hostiles or see a weird stationary fighter in the middle of action.
add-goal play-dead + ship-maneuver
Speaking of play-dead, use play dead plus the ship-maneuver sexps to finely adjust a ship's movement. The AI must be playing dead for the ship-maneuver sexps to work. Any orders and even no orders won't cause the ship to move as specified.
set-post-effect
All sorts of fun can be had here with setting different post processing effects. Desaturate the cutscene, add in noise, stripes. Try not to go TOO wild with it though, we want to see the pretty ships blow up after all.
