POF to Blender Conversions
Contents
Important Wiki Page Links:
Blender to POF Conversions, Blender, POF Constructor Suite 2, Collada Importer
Getting a Collada-capable PCS2 version:
- The main PCS2 installer package Install this first so you have the correct DLLs in place in your PCS2 directory.
- The DAE capable PCS2 EXE itself Place this in your PCS2 directory, backing up the previous one if you like.
- Dependency 1: The libcollada DLL file Place this in your PCS2 directory.
- Dependency 2: The Microsoft VC2008 SP1 Runtime You might already have this installed from some other program, but if not you'll need this installed too.
Exporting the DAE out of PCS2:
Open PCS2, and then go to File -> Open and locate the POF file you want to convert to DAE and open up in Blender. Once it has opened successfully, save it by going to File -> Save and change the file type to DAE.
By default PCS2 will save your DAE with 'helpers' (Empties as Blender knows them by) that represent almost all the POF data. Unfortunately Blender has a lot of trouble with long helper names (such as subobject properties) being truncated. This limits the usefulness of importing the POF data in the first place, and it is usually much simpler not to export this data and either import it from the old version of the POF once you convert it back, or rebuild it entirely in PCS2.
To tell PCS2 to export DAEs without any helpers, go to Options -> Preferences and UNCHECK "Export helpers to DAE". If you just want everything except the troublesome subobject properties, CHECK "Export helpers to DAE" and UNCHECK "Export properties as helpers".
Incidentally you do not need to worry about mirroring any DAE axes if you noticed those three checkboxes to the right of the aforementioned ones. Those are to correct for other DAE importers in other 3d applications, but Blender should get these axes the right way round.
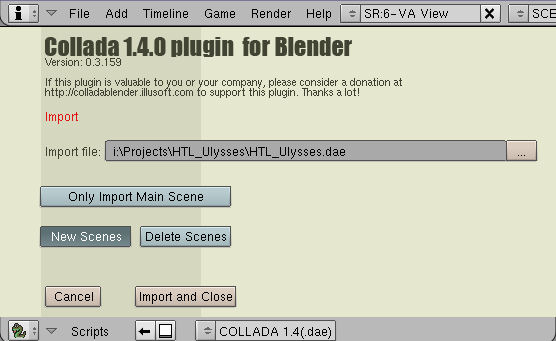
Recommended Blender DAE Import Settings:
In Blender, to import an existing DAE, go to File -> Import -> Collada 1.4(DAE) and it is advisable to use the following options:

Correcting for the Blender DAE Importer's slight bug:
There is a small bug in the DAE import script in Blender where it tends to create at least one extra scene besides the original scene no matter what your importer settings are. (And some settings other than the previously recommended ones currently cause the import to fail)
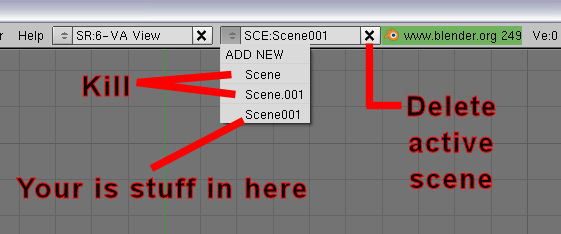
To switch between active scenes use this dropdown menu:

Usually after a DAE import it will look like this:

So in more detail:
- Select "Scene" from the dropdown menu. Your scene will probably switch back to the default Blender scene with the cube, camera and lamp.
- Press the black X on the right hand side of the Scene dropdown list and confirm to delete it.
- Do the same for "Scene.001"
- KEEP "Scene001" as this is the scene with your imported model in it. I like to rename it back to "Scene" just in case but I don't think this is nessecary.
NOTE: If you ever find you have components of ship spread over multiple scenes, selecting the wayward objects and pressing Ctrl + L -> Make link to scene -> selecting the desired destination scene will allow you to reunite them with the rest of your ship.