Difference between revisions of "Guide to FS Open and git"
m (→Syncing: Tortoise Git) |
(→Getting the source: Tortoise Git) |
||
| (42 intermediate revisions by 4 users not shown) | |||
| Line 1: | Line 1: | ||
== Getting the source: Tortoise Git == | == Getting the source: Tortoise Git == | ||
| − | (based on [[Getting_the_FreeSpace2:_SCP_Source_Code]]) | + | (based on a previous revision of [[Getting_the_FreeSpace2:_SCP_Source_Code]]) |
| − | * Download and install [ | + | {{note|this is intended for people who want to get the code and compile executables. If you want to write code & submit patches, see the [[Guide_to_FS_Open_and_git#Simple_Development:_Tortoise_Git | next section]] }} |
| − | * Download and install [ | + | |
| − | * Make a new folder on your HDD where you'd like to install the code. You'll need a fair bit of space for the code + the intermediate files when building it. Press right mouse and choose Git Clone from the list. | + | * Download and install [https://gitforwindows.org/ Git For Windows] (this is a dependency for TortoiseGit) |
| − | [[File:Git-clone- | + | * Download and install [https://tortoisegit.org/ TortoiseGit] (you probably need to reboot after installing) |
| − | * A new window will open up. Cut and paste the URL of the FSO Github repository into the URL of repository box (https://github.com/scp-fs2open/fs2open.github.com.git) | + | |
| − | + | {{gitdocostep | image=[[File:Git-clone-1a.png]] | text= | |
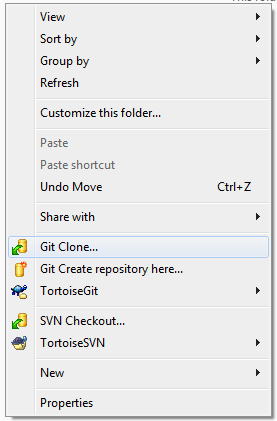
| + | * Make a new folder on your HDD where you'd like to install the code. | ||
| + | ** You'll need a fair bit of space for the code + the intermediate files when building it. | ||
| + | * Press right mouse and choose Git Clone from the list. | ||
| + | | cmdlinetxt=N/A; see next step | ||
| + | }} | ||
| + | |||
| + | {{gitdocostep | image=[[File:Git-clone-2a.png]] | text= | ||
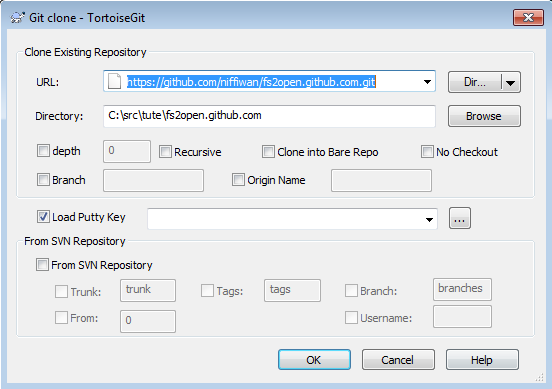
| + | * A new window will open up. Cut and paste the URL of the FSO Github repository into the URL of repository box | ||
| + | ** (https://github.com/scp-fs2open/fs2open.github.com.git) | ||
* Press OK to begin downloading from the repository (this may take a few minutes, depending on the speed of your internet connection) | * Press OK to begin downloading from the repository (this may take a few minutes, depending on the speed of your internet connection) | ||
| + | | cmdlinetxt=git clone https://github.com/scp-fs2open/fs2open.github.com.git | ||
| + | }} | ||
| + | <div style="clear: both"></div> | ||
== Simple Development: Tortoise Git == | == Simple Development: Tortoise Git == | ||
| − | Note | + | {{Note | The guide assumes that you will be developing using a github fork (which is recommended for everyone, SCP members and non-members alike) }} |
| + | {{gitdocostep | image=[[File:Github-forka.png|900px]] | text= | ||
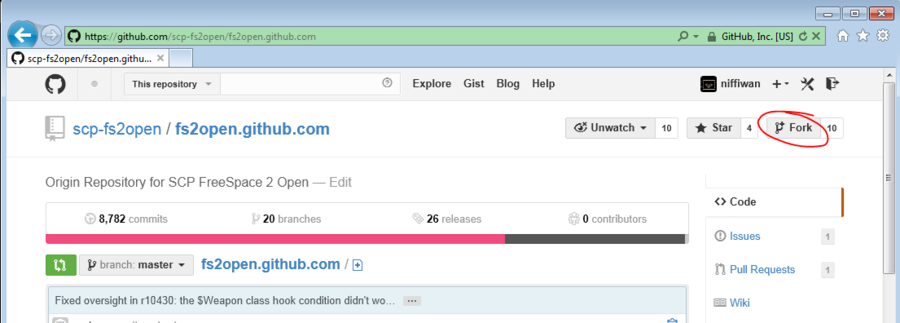
* Go to the [https://github.com github webpage] and create an account | * Go to the [https://github.com github webpage] and create an account | ||
* Go to the [https://github.com/scp-fs2open/fs2open.github.com FSO repository on github] and click on Fork | * Go to the [https://github.com/scp-fs2open/fs2open.github.com FSO repository on github] and click on Fork | ||
| − | [[File:Github- | + | |cmdlinetxt=N/A |
| + | }} | ||
| + | |||
| + | {{gitdocostep | image=[[File:Github-fork-2.png|900px]] | text= | ||
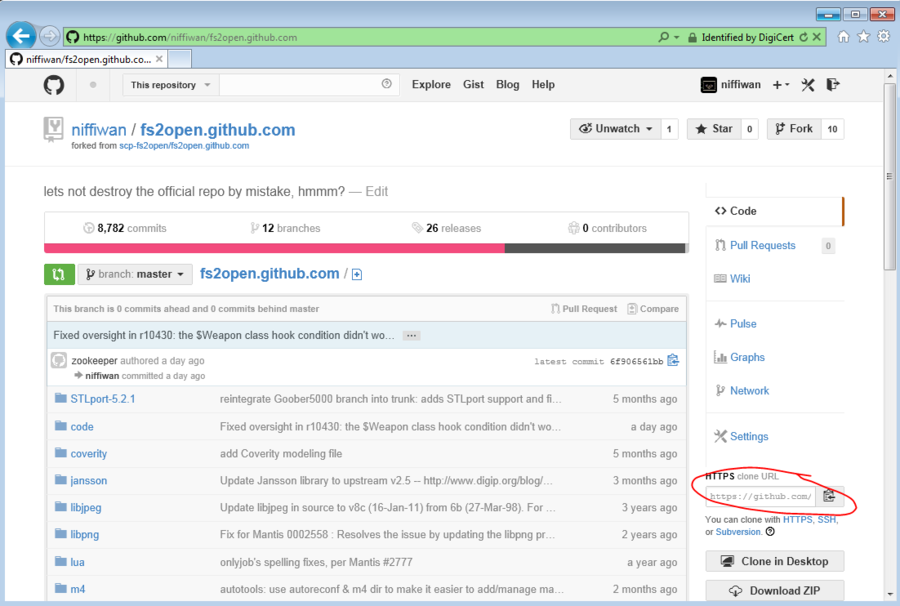
* Record the URL for your newly forked copy of the FSO repository | * Record the URL for your newly forked copy of the FSO repository | ||
| − | [[File: | + | |cmdlinetxt=N/A |
| − | * | + | }} |
| + | |||
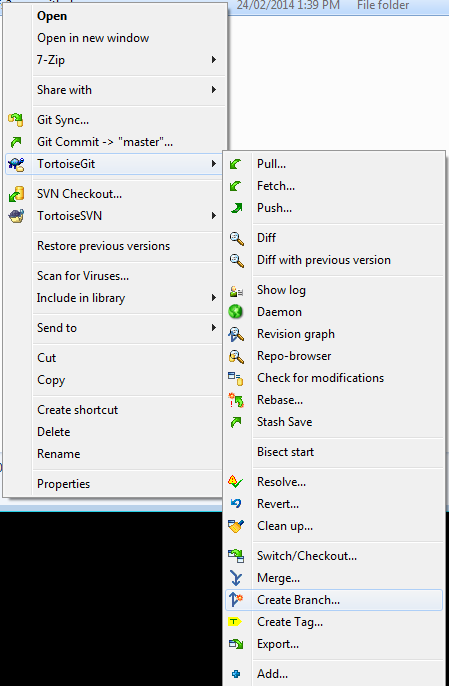
| + | {{gitdocostep | image=[[File:Git-branch-1a.png]] | text= | ||
| + | * Install the software and get the code per the [[Guide to FS Open and git#Getting the source: Tortoise Git|guide above]] | ||
** Note: you need to use the URL for '''your forked repository''', not the main FSO repository listed above | ** Note: you need to use the URL for '''your forked repository''', not the main FSO repository listed above | ||
* Right click on the repository directory and select TortoiseGit -> Create Branch | * Right click on the repository directory and select TortoiseGit -> Create Branch | ||
** Note: all development should be done in a new branch, instead of being done in the "master" branch. It's just simpler | ** Note: all development should be done in a new branch, instead of being done in the "master" branch. It's just simpler | ||
| − | [[File:Git-branch- | + | |cmdlinetxt=git clone https://YOUR/FORKS/URL |
| + | }} | ||
| + | |||
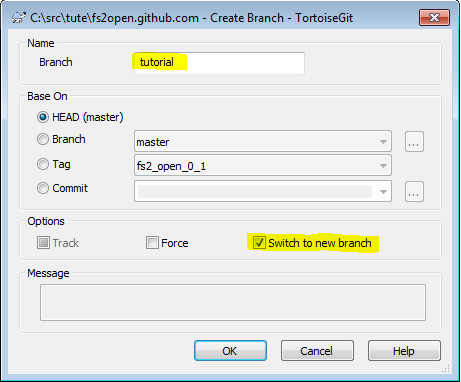
| + | {{gitdocostep | image=[[File:Git-branch-2a.png]] | text= | ||
* In the new window, enter the name for the new branch, verify that the branch is based on HEAD (master) and check the "Switch to new branch" box | * In the new window, enter the name for the new branch, verify that the branch is based on HEAD (master) and check the "Switch to new branch" box | ||
| − | [[File:Git- | + | |cmdlinetxt=git checkout -b BRANCH_NAME master |
| + | }} | ||
| + | |||
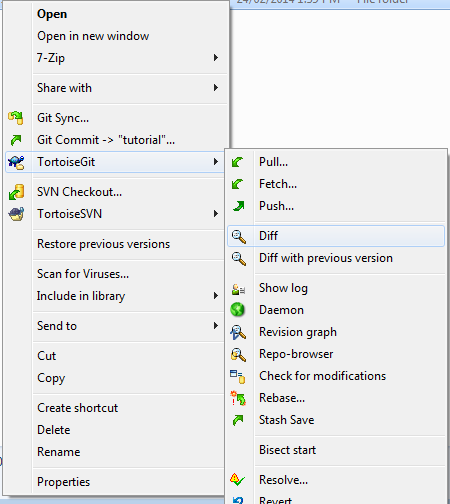
| + | {{gitdocostep | image=[[File:Git-commit-1a.png]] | text= | ||
* Write some code with your Editor of Choice | * Write some code with your Editor of Choice | ||
* Test your new code | * Test your new code | ||
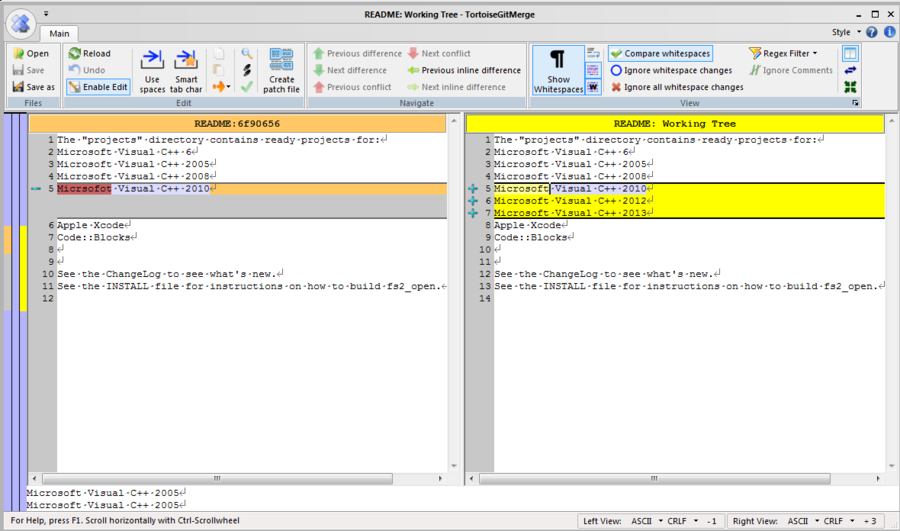
* When you're happy with the code, right click on the repository directory and select TortoiseGit -> Diff | * When you're happy with the code, right click on the repository directory and select TortoiseGit -> Diff | ||
| − | [[File:Git-commit- | + | |cmdlinetxt=git diff |
| + | }} | ||
| + | |||
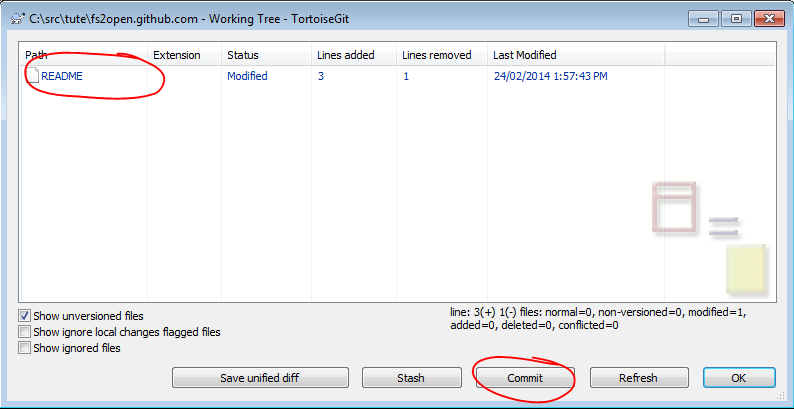
| + | {{gitdocostep | image=[[File:Git-commit-2a.png]] | text= | ||
* Review your changes by double-clicking on all the files listed in the new window (ensure no unwanted changes have snuck in!). | * Review your changes by double-clicking on all the files listed in the new window (ensure no unwanted changes have snuck in!). | ||
| − | [[File:Git-commit- | + | |cmdlinetxt=N/A |
| + | }} | ||
| + | |||
| + | {{gitdocostep | image=[[File:Git-commit-3.png|900px]] | text= | ||
* This is how the diff will be displayed (using TortoiseGitMerge, which is also used to resolve conflicts) | * This is how the diff will be displayed (using TortoiseGitMerge, which is also used to resolve conflicts) | ||
| − | [[File:Git-commit- | + | |cmdlinetxt=N/A |
| + | }} | ||
| + | |||
| + | |||
| + | {{gitdocostep | image=[[File:Git-commit-4a.png]] | text= | ||
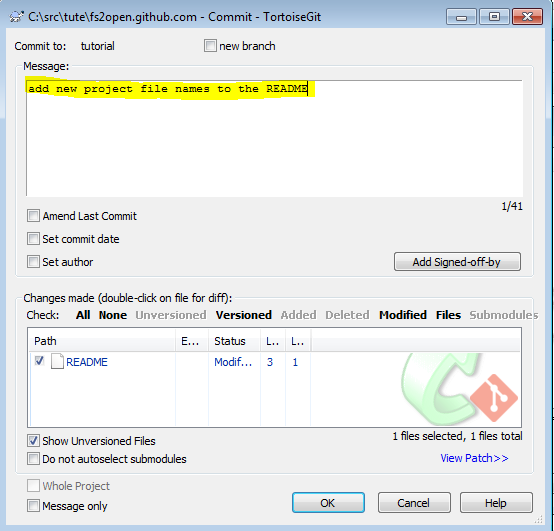
* When your review is complete, press "Commit" (in the same window that you double clicked on all the changed files) | * When your review is complete, press "Commit" (in the same window that you double clicked on all the changed files) | ||
* In the new window, add a commit message and press OK | * In the new window, add a commit message and press OK | ||
| − | [[File:Git-commit- | + | |cmdlinetxt=git commit -a |
| + | }} | ||
| + | |||
| + | {{gitdocostep | image=[[File:Git-commit-5a.png]] | text= | ||
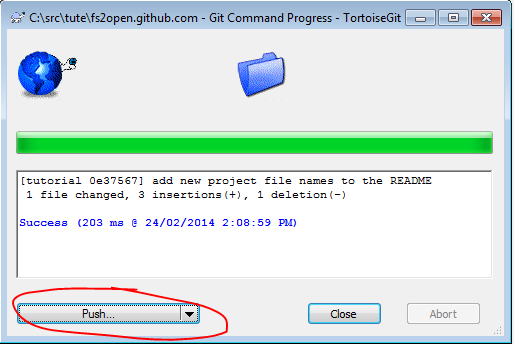
* When the commit is complete, press the "push" button to send your commit(s) to your github repository | * When the commit is complete, press the "push" button to send your commit(s) to your github repository | ||
| − | [[File:Git-commit- | + | |cmdlinetxt=git push origin BRANCH_NAME |
| + | }} | ||
| + | |||
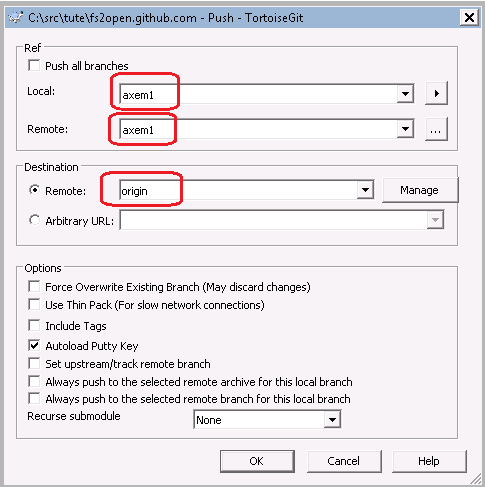
| + | {{gitdocostep | image=[[File:Git-commit-6a.png]] | text= | ||
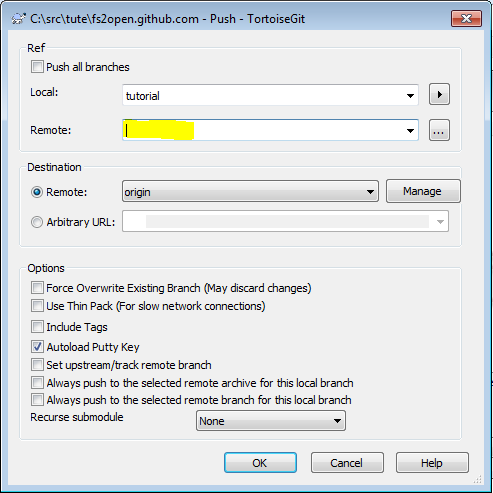
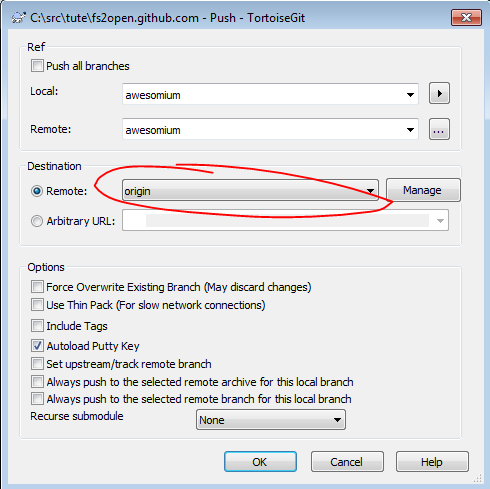
* Select your local branch name from the drop down list and ensure your Destination -> Remote: is "origin" | * Select your local branch name from the drop down list and ensure your Destination -> Remote: is "origin" | ||
* If you want to, you can give the public remote branch a different name to your local branch (this can be useful when rebasing a branch already published to your public repository) | * If you want to, you can give the public remote branch a different name to your local branch (this can be useful when rebasing a branch already published to your public repository) | ||
* Finally, press OK | * Finally, press OK | ||
| − | [[File:Git-commit- | + | |cmdlinetxt=N/A |
| + | }} | ||
| + | |||
| + | {{gitdocostep | image=[[File:Git-commit-7a.png|900px]] | text= | ||
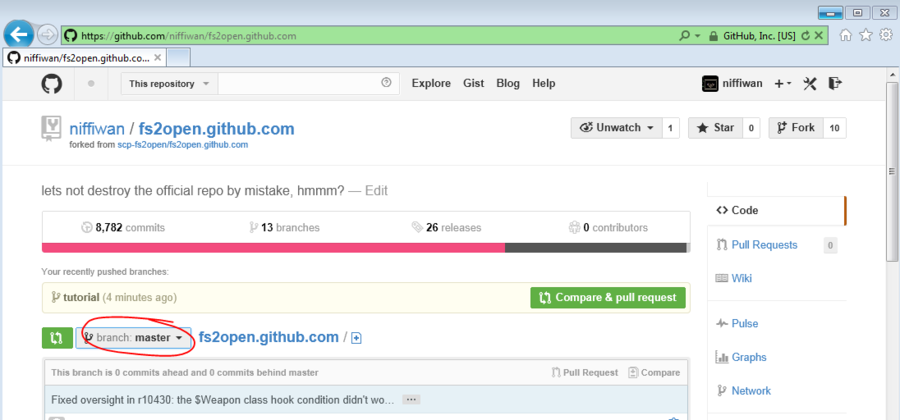
* Go to your Github Repository webpage and select the branch you just pushed | * Go to your Github Repository webpage and select the branch you just pushed | ||
| − | [[File:Git-commit- | + | |cmdlinetxt=N/A |
| + | }} | ||
| + | |||
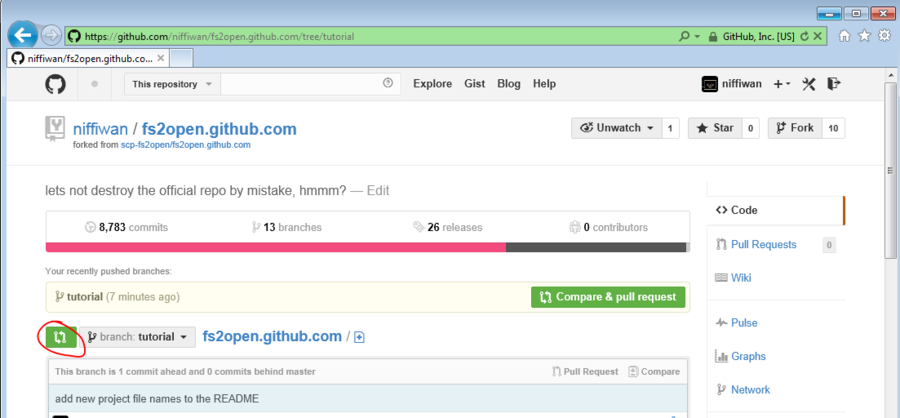
| + | {{gitdocostep | image=[[File:Git-commit-8a.png|900px]] | text= | ||
* When you have the correct branch selected, click on the "Pull/Review/Compare" button | * When you have the correct branch selected, click on the "Pull/Review/Compare" button | ||
| − | [[File:Git-commit-8a.png]] | + | |cmdlinetxt=N/A |
| + | }} | ||
| + | |||
| + | {{gitdocostep | image=[[File:Git-commit-8a.png|900px]] | text= | ||
* Now click on "Create Pull Request" | * Now click on "Create Pull Request" | ||
| − | + | |cmdlinetxt=N/A | |
| − | + | }} | |
| + | * Note: The previous three steps can be done as a single step if you have recently pushed a branch by selecting the "Compare and Pull Request" button | ||
| + | |||
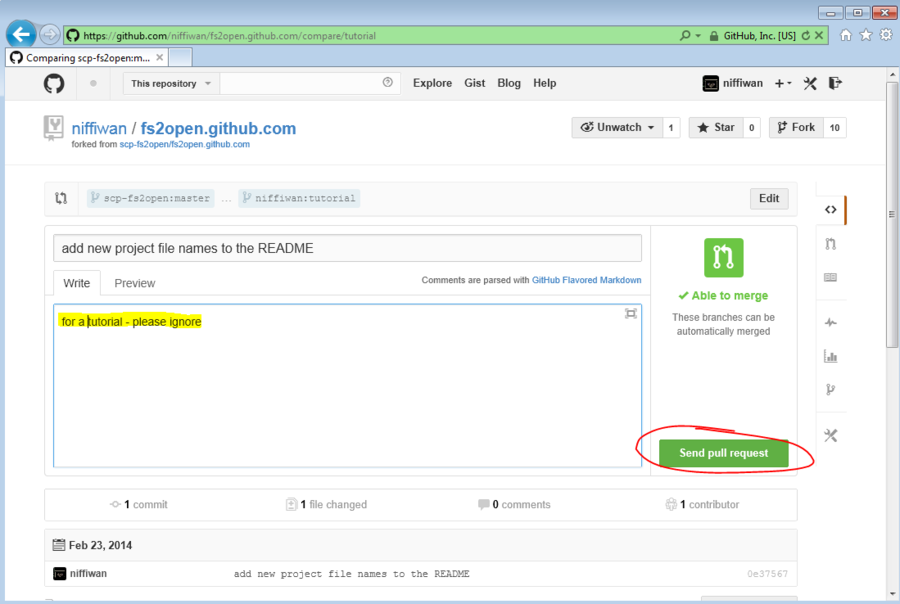
| + | {{gitdocostep | image=[[File:Git-commit-10.png|900px]] | text= | ||
* Add comments to the pull request if you wish, then click "Send Pull Request" | * Add comments to the pull request if you wish, then click "Send Pull Request" | ||
| − | + | |cmdlinetxt=N/A | |
| − | * | + | }} |
| + | |||
| + | * That's it! Now wait for the pull request to be reviewed and committed to primary FSO master branch | ||
| + | |||
| + | <div style="clear: both"></div> | ||
== Syncing: Tortoise Git == | == Syncing: Tortoise Git == | ||
| Line 60: | Line 117: | ||
=== Pushing === | === Pushing === | ||
| − | + | This section will go over synchronizing your local git repo with a remote | |
| − | |||
| + | {{gitdocostep | image=[[File:Git-sync-push-1a.png]] | text= | ||
Once you've committed to your local git repo and verified its integrity (a simple build-check will suffice), you should update the remote repo through the "Push" process. | Once you've committed to your local git repo and verified its integrity (a simple build-check will suffice), you should update the remote repo through the "Push" process. | ||
*Right click on the repository directory and select "Push..." | *Right click on the repository directory and select "Push..." | ||
| + | }} | ||
| + | {{gitdocostep | image=[[File:Git-sync-push-2a.png]] | text= | ||
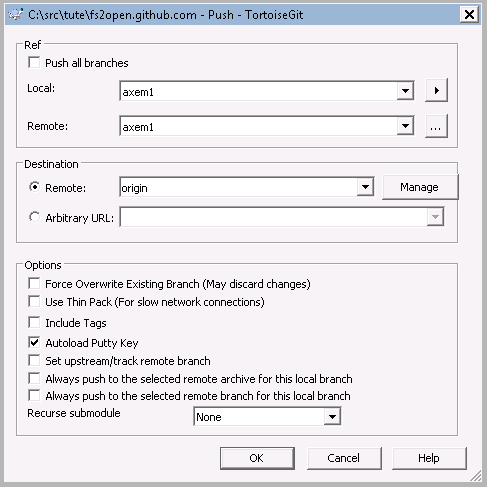
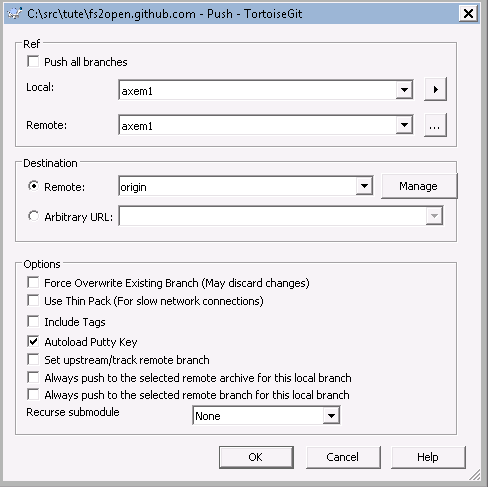
The Push dialog is displayed. From here, you can push one or more branches from one repo to another, local and remote alike. The "Ref" control group will be the repo that will be pushed onto the repo specified in the "Destination" control group. If you are managing multiple remotes, you may also push one remote to another. | The Push dialog is displayed. From here, you can push one or more branches from one repo to another, local and remote alike. The "Ref" control group will be the repo that will be pushed onto the repo specified in the "Destination" control group. If you are managing multiple remotes, you may also push one remote to another. | ||
| Line 76: | Line 135: | ||
*Click OK to start the push | *Click OK to start the push | ||
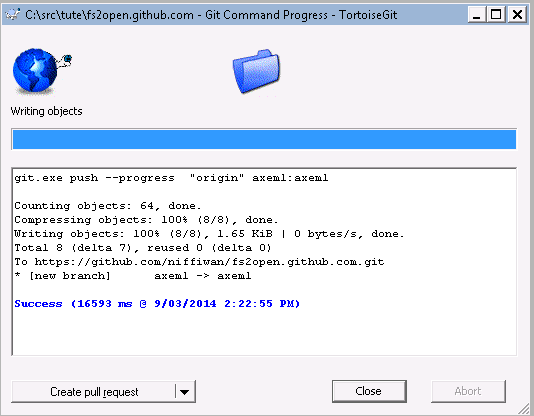
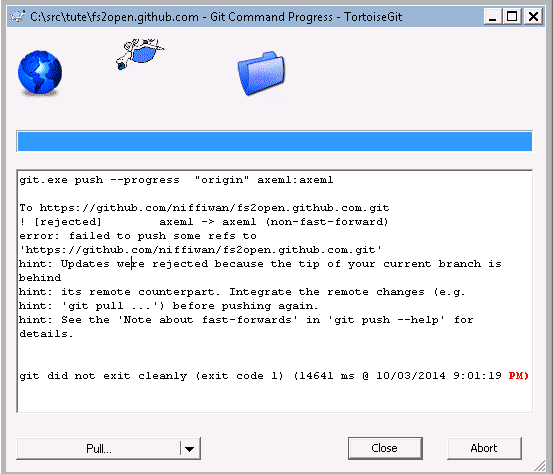
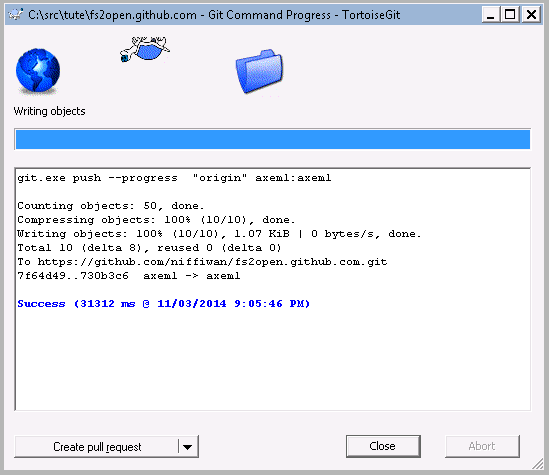
| − | If a conflict between the remote repo and your local repo arises, git will halt the push. | + | If a conflict between the remote repo and your local repo arises, git will halt the push. Otherwise it should complete as shown below. |
| + | }} | ||
| + | <div style="clear: both"></div> | ||
=== Pulling === | === Pulling === | ||
| Line 82: | Line 143: | ||
This section will go over pulling commits from an "upstream" remote (assuming that you're developing in a github forked repo and you want to get new commits from the "official" repo) | This section will go over pulling commits from an "upstream" remote (assuming that you're developing in a github forked repo and you want to get new commits from the "official" repo) | ||
| − | {{gitdocostep | image= | text= | + | {{gitdocostep | image=[[File:Git-sync-1.png]] | text= |
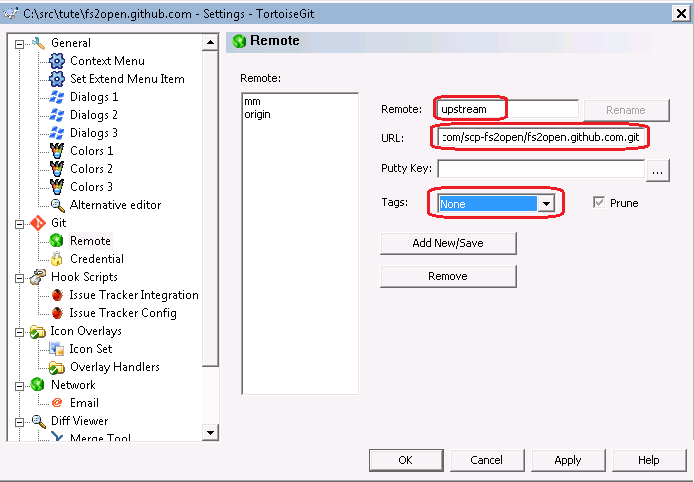
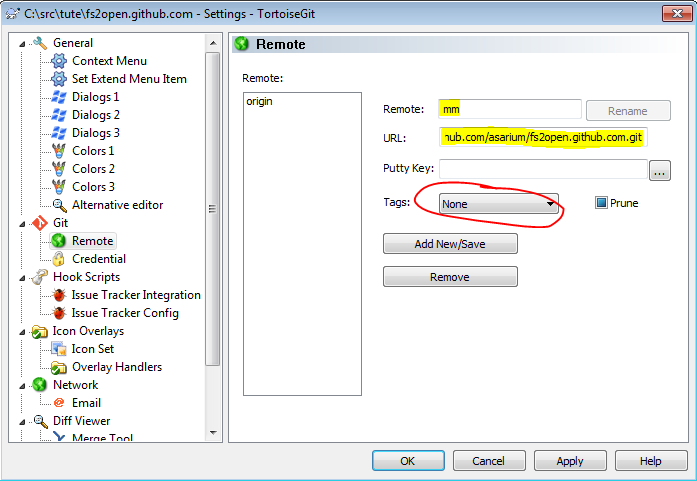
If you don't already have it, add the official repo as a remote called "upstream" | If you don't already have it, add the official repo as a remote called "upstream" | ||
* Right click on your local repo dir | * Right click on your local repo dir | ||
* Select TortoiseGit -> Settings | * Select TortoiseGit -> Settings | ||
| + | * Select Git -> Remote | ||
| + | * In the Remote field, enter "upstream" | ||
| + | * In the URL field, enter the URL of the official repo | ||
| + | * Set the Tags drop-down box to "None" | ||
| + | * Click "Add New/Save" | ||
}} | }} | ||
| − | {{gitdocostep | image= | text= | + | {{gitdocostep | image=[[File:Git-addremote-3.png]] | text= |
* You should be prompted if you want to "...fetch remote branches...", select "Yes" | * You should be prompted if you want to "...fetch remote branches...", select "Yes" | ||
}} | }} | ||
| − | {{gitdocostep | image= | text= | + | {{gitdocostep | image=[[File:Git-sync-2.png]] | text= |
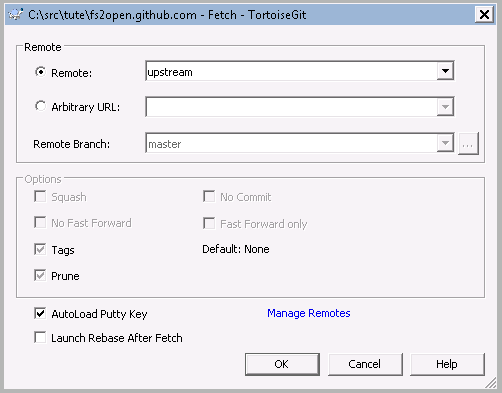
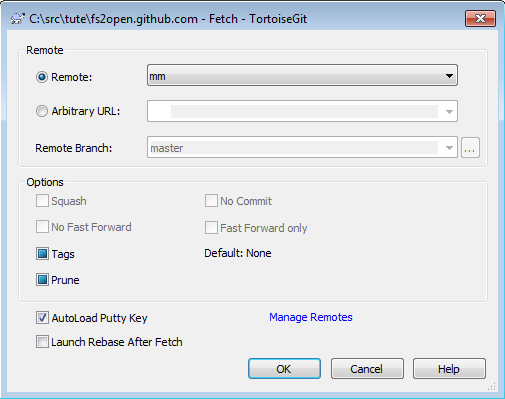
The defaults in the next screen are fine, click OK to "fetch" all the "upstream" commits | The defaults in the next screen are fine, click OK to "fetch" all the "upstream" commits | ||
}} | }} | ||
| − | {{gitdocostep | image= | text= | + | {{gitdocostep | image=[[File:Git-sync-3.png]] | text= |
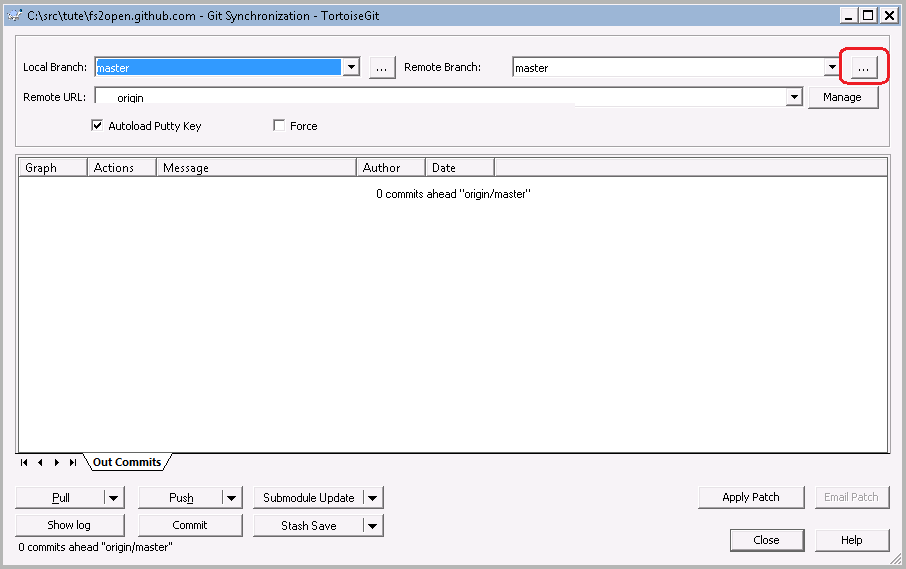
Now we "pull" the commits from the upstream master into our own master | Now we "pull" the commits from the upstream master into our own master | ||
* Switch to your local repo master branch (optional really, you can set this in the next step) | * Switch to your local repo master branch (optional really, you can set this in the next step) | ||
| Line 103: | Line 169: | ||
}} | }} | ||
| − | {{gitdocostep | image= | text= | + | {{gitdocostep | image=[[File:Git-sync-4.png]] | text= |
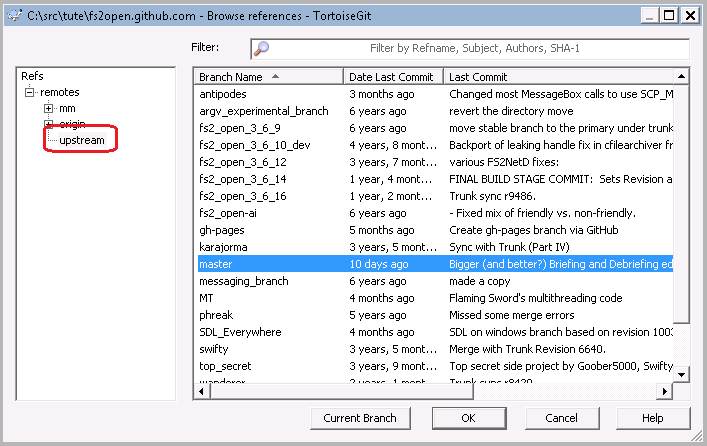
* Select the upstream remote repo in the left hand window | * Select the upstream remote repo in the left hand window | ||
* Select the master remote branch in the right hand window | * Select the master remote branch in the right hand window | ||
| Line 109: | Line 175: | ||
}} | }} | ||
| − | {{gitdocostep | image= | text= | + | {{gitdocostep | image=[[File:Git-sync-5.png]] | text= |
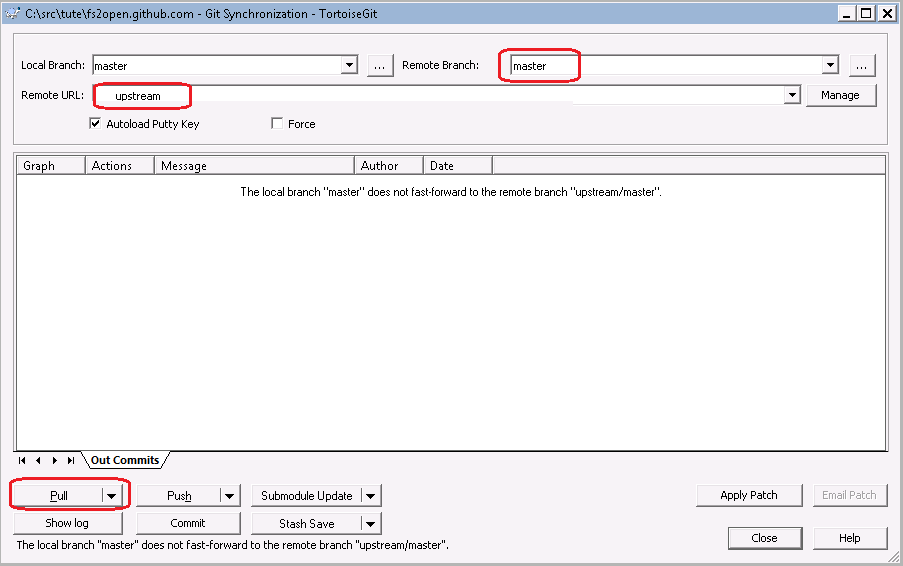
We're back to the previous window. Note how the remote repo and remote branch dropdowns are set to upstream/master | We're back to the previous window. Note how the remote repo and remote branch dropdowns are set to upstream/master | ||
* Click on Pull to import commits | * Click on Pull to import commits | ||
* Wait until the process completes... and that is it | * Wait until the process completes... and that is it | ||
* As always you can use "Show Log" to review the new commits | * As always you can use "Show Log" to review the new commits | ||
| + | }} | ||
| + | <div style="clear: both"></div> | ||
| + | |||
| + | |||
| + | === Resolving Conflicts === | ||
| + | |||
| + | This is a simple example of how to resolve a conflict that occurs when you try to push changes to a public repo. This example specifically used: | ||
| + | * A github "personal" repo cloned from another "master" repo | ||
| + | * A branch with conflicting changes; one computer committed changes to a file, while the 2nd computer (running TGit) committed changes to the same lines in that file. | ||
| + | * And yes, the changes are silly | ||
| + | |||
| + | {{gitdocostep | image=[[File:Git-push-conflict-1.png]] | text= | ||
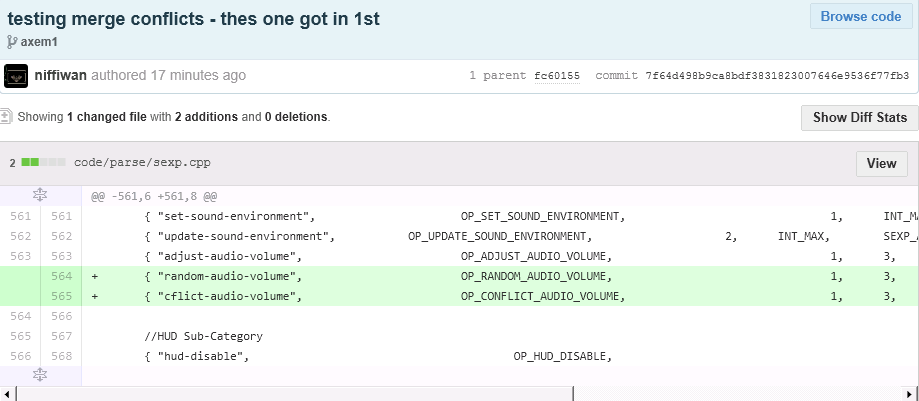
| + | Here's the commit from the other computer. | ||
| + | }} | ||
| + | |||
| + | {{gitdocostep | image=[[File:Git-push-conflict-2.png]] | text= | ||
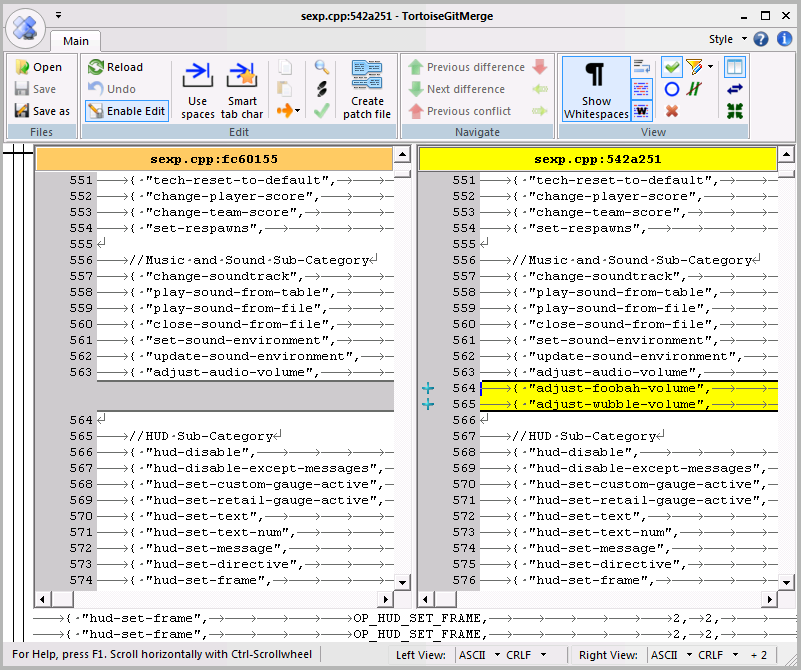
| + | Here's the commit in your local repo that you're about to push to the same branch. | ||
| + | }} | ||
| + | |||
| + | {{gitdocostep | image=[[File:Git-push-conflict-3.png]] | text= | ||
| + | * Right click and select "push", accept all the defaults | ||
| + | }} | ||
| + | |||
| + | {{gitdocostep | image=[[File:Git-push-conflict-4.png]] | text= | ||
| + | As expected that didn't work... | ||
| + | }} | ||
| + | |||
| + | {{gitdocostep | image=[[File:Git-push-conflict-5.png]] | text= | ||
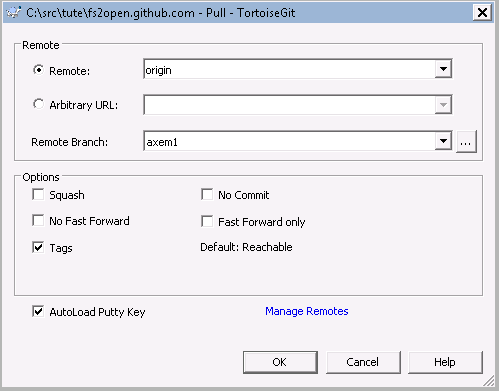
| + | As suggested, try a pull with the default options. | ||
| + | }} | ||
| + | |||
| + | {{gitdocostep | image=[[File:Git-push-conflict-6.png]] | text= | ||
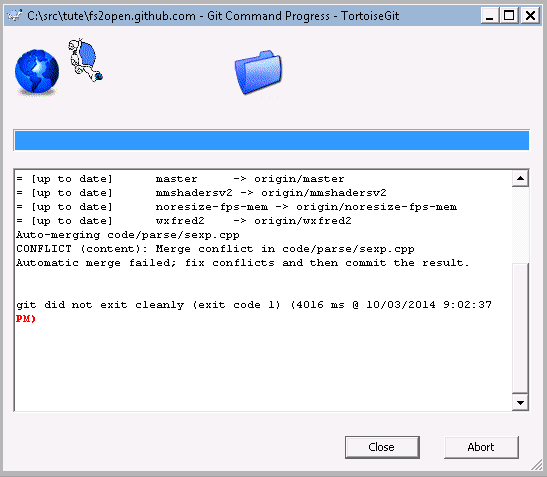
| + | As expected we have merge conflicts. | ||
| + | }} | ||
| + | |||
| + | {{gitdocostep | image=[[File:Git-push-conflict-7.png]] | text= | ||
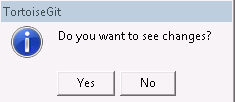
| + | At this "yes / no" prompt either options can be picked, it'll be a bit quicker to pick "yes" if you want to resolve the conflict now. | ||
| + | }} | ||
| + | |||
| + | {{gitdocostep | image=[[File:Git-push-conflict-8.png]] | text= | ||
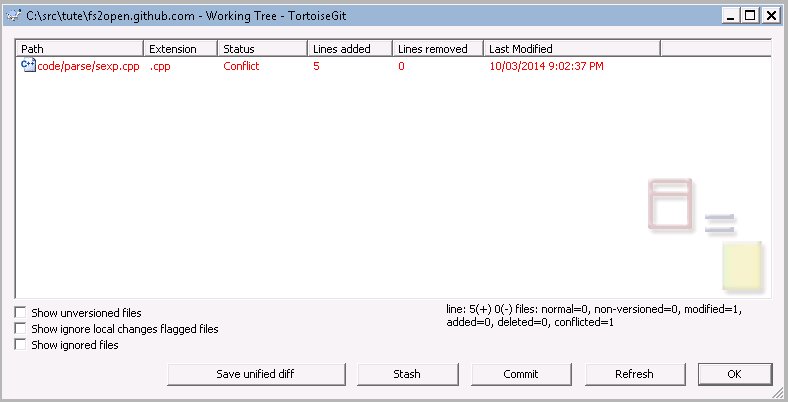
| + | If you didn't pick yes in the previous step, you can get this window by select "Diff" from the TGit menu | ||
| + | * Start TGitMerge by doubling clicking on a file that has the status of "conflict" (only one file in this example) | ||
| + | }} | ||
| + | |||
| + | {{gitdocostep | image=[[File:Git-push-conflict-9.png]] | text= | ||
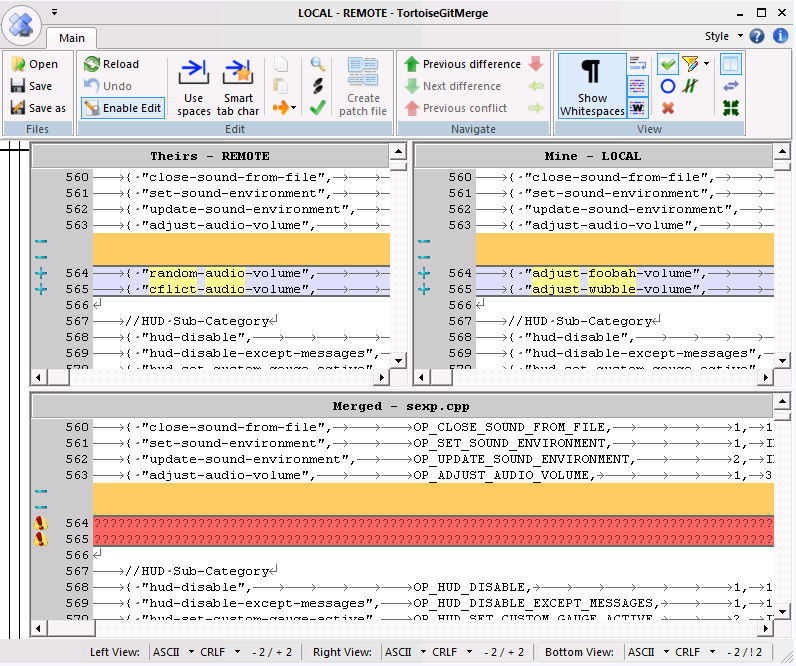
| + | "Resolve the conflict" (often simpler said than done). Some tips are available [[Guide_to_FS_Open_and_git#TortoiseGitMerge_Tips | here]]. | ||
| + | }} | ||
| + | |||
| + | |||
| + | {{gitdocostep | image=[[File:Git-push-conflict-10.png]] | text= | ||
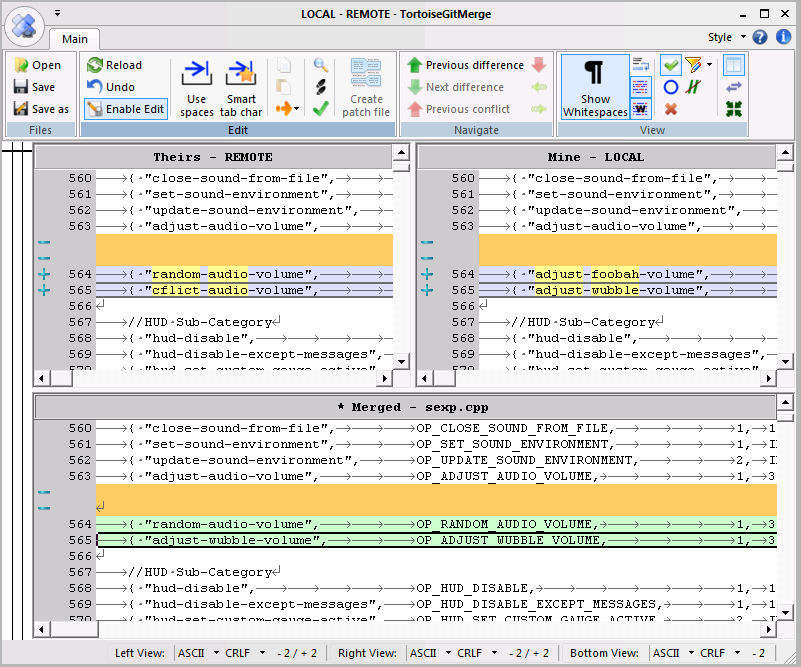
| + | Since this is a trivial example, I've used an equally trivial resolution of taking one line from remote repo and one from the local repo. | ||
| + | * When you're finished, click on the save button | ||
| + | }} | ||
| + | |||
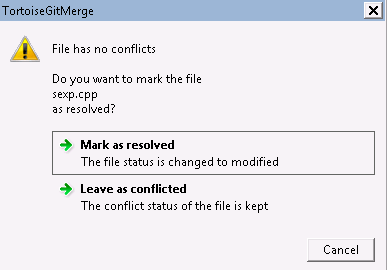
| + | {{gitdocostep | image=[[File:Git-push-conflict-11.png]] | text= | ||
| + | A prompt should appear asking if you want to mark the conflict as resolved. | ||
| + | * If you're happy with the resolution, select yes | ||
| + | * If you've messed something up and want to start over, select no | ||
| + | }} | ||
| + | |||
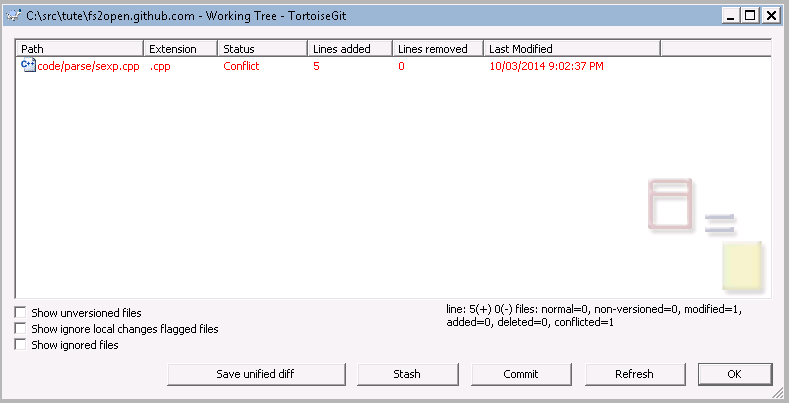
| + | {{gitdocostep | image=[[File:Git-push-conflict-12.png]] | text= | ||
| + | Note that the Diff window hasn't updated, it still says the file has a conflict :/ If you double click on the file however, nothing will happen. | ||
| + | * Since the conflict is resolved and there was only one file with a conflict, close the Diff window. | ||
| + | }} | ||
| + | |||
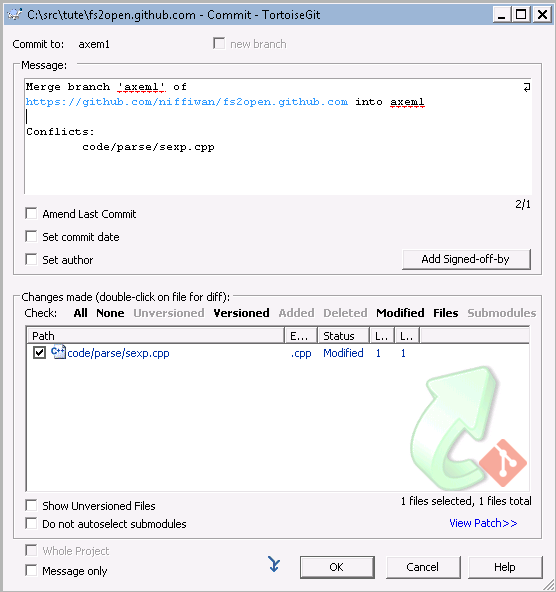
| + | {{gitdocostep | image=[[File:Git-push-conflict-13.png]] | text= | ||
| + | Commit your changes | ||
| + | * Right click and select "Commit -> {Branch Name}" | ||
| + | ** As an alternative, you could probably have clicked commit in the Diff window (previous step) | ||
| + | * The default commit message is fine in this case, so just click OK | ||
| + | }} | ||
| + | |||
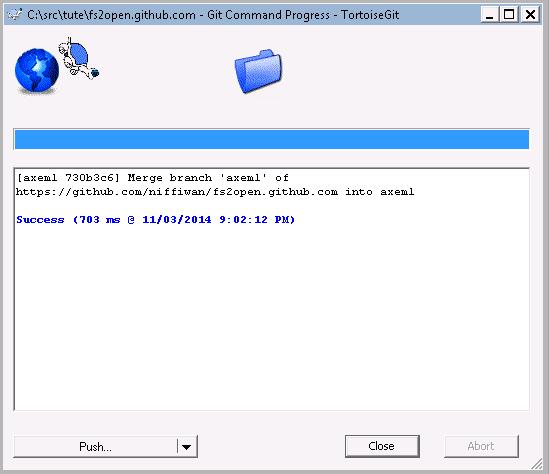
| + | {{gitdocostep | image=[[File:Git-push-conflict-14.png]] | text= | ||
| + | The commit was successful. | ||
| + | }} | ||
| + | |||
| + | {{gitdocostep | image=[[File:Git-push-conflict-15.png]] | text= | ||
| + | Now back to what was originally wanted - push the changes to the remote repo | ||
| + | * Enter your username & password when prompted | ||
| + | }} | ||
| + | |||
| + | {{gitdocostep | image=[[File:Git-push-conflict-16.png]] | text= | ||
| + | Success! | ||
| + | }} | ||
| + | |||
| + | <div style="clear: both"></div> | ||
| + | |||
| + | === Sync changes with upstream === | ||
| + | |||
| + | This section will go over synchronizing your local git development branch with the changes made to the official master branch. | ||
| + | |||
| + | Option 1; Rebase (grudgingly *recommended* since most of the SCP seem to prefer this approach) | ||
| + | NOTE: This will change all your commit IDs/hashes; you *should ensure* that no one else has used your existing commits before you rebase. What's that? You pushed commits to a public repo? Then: | ||
| + | * you can't ensure that so you're going to make life miserable for anyone that has used your old commits. | ||
| + | * to push again to a public repo you're going to need to use the --force option; *NEVER EVER EVER* use --force on a master branch, you will delete, possibly permanently, someone else's commits (they surely aren't coming back with the same commit IDs... which means _everyone_ probably needs to nuke their fork and start again) | ||
| + | |||
| + | {{gitdocostep | image=none | text= | ||
| + | Fetch the changes in the official/upstream master branch | ||
| + | |cmdlinetxt=git fetch upstream master | ||
| + | }} | ||
| + | |||
| + | {{gitdocostep | image=none | text= | ||
| + | Merge those changes with your local master (possibly optional) | ||
| + | |cmdlinetxt=git checkout master; git merge upstream/master --ff-only | ||
| + | }} | ||
| + | |||
| + | {{gitdocostep | image=none | text= | ||
| + | Rebase the changes onto your local branch directly from master | ||
| + | |cmdlinetxt=git checkout YOUR_BRANCH; git rebase upstream/master | ||
| + | }} | ||
| + | |||
| + | {{gitdocostep | image=none | text= | ||
| + | Resolve any conflicts (see the relevant section) | ||
| + | |cmdlinetxt=(see the relevant section) | ||
| + | }} | ||
| + | |||
| + | Option 2; Merge | ||
| + | NOTE: This will add extra "merge commits" to your history, and when you create a PR those extra commits will probably end up in the main master branch. Some consider this to be ugly. | ||
| + | |||
| + | {{gitdocostep | image=none | text= | ||
| + | Fetch the changes in the official/upstream master branch | ||
| + | |cmdlinetxt=git fetch upstream master | ||
| + | }} | ||
| + | |||
| + | {{gitdocostep | image=none | text= | ||
| + | Merge those changes with your local master (possibly optional) | ||
| + | |cmdlinetxt=git checkout master; git merge upstream/master --ff-only | ||
| + | }} | ||
| + | |||
| + | {{gitdocostep | image=none | text= | ||
| + | Merge the local master with your branch | ||
| + | |cmdlinetxt=git checkout YOUR_BRANCH; git merge master | ||
| + | }} | ||
| + | |||
| + | {{gitdocostep | image=none | text= | ||
| + | Resolve any conflicts (see the relevant section) | ||
| + | |cmdlinetxt=(see the relevant section) | ||
}} | }} | ||
| Line 119: | Line 322: | ||
== Collaboration with remotes: Tortoise Git == | == Collaboration with remotes: Tortoise Git == | ||
| − | + | === Forking a Branch === | |
Here we'll go through: | Here we'll go through: | ||
| Line 127: | Line 330: | ||
You may do this when you're collaborating on a feature prior to it being committed to the master | You may do this when you're collaborating on a feature prior to it being committed to the master | ||
| + | |||
| + | {{gitdocostep | image=[[File:Git-addremote-1.png]] | text= | ||
* Start by right clicking on the local repository directory and selecting "Settings" | * Start by right clicking on the local repository directory and selecting "Settings" | ||
| − | [[File:Git-addremote- | + | }} |
| + | |||
| + | {{gitdocostep | image=[[File:Git-addremote-2.png]] | text= | ||
* Select the "Remote" item from the left hand menu, then | * Select the "Remote" item from the left hand menu, then | ||
** add a local name for the new remote repository | ** add a local name for the new remote repository | ||
| Line 134: | Line 341: | ||
** Set the "Tags" dropdown to "None" | ** Set the "Tags" dropdown to "None" | ||
** Click "Add New/Save" | ** Click "Add New/Save" | ||
| − | [[File:Git-addremote- | + | }} |
| + | |||
| + | |||
| + | {{gitdocostep | image=[[File:Git-addremote-3.png]] | text= | ||
* You should be prompted if you want to "...fetch remote branches...", select "Yes" | * You should be prompted if you want to "...fetch remote branches...", select "Yes" | ||
| − | [[File:Git-addremote- | + | }} |
| + | |||
| + | {{gitdocostep | image=[[File:Git-addremote-4.png]] | text= | ||
* All the defaults should be fine, click "OK" | * All the defaults should be fine, click "OK" | ||
* Note that this step may take a little time | * Note that this step may take a little time | ||
| − | [[File:Git- | + | }} |
| + | |||
| + | {{gitdocostep | image=[[File:Git-remotebranch-1.png]] | text= | ||
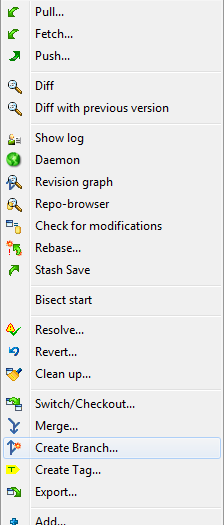
* When it's complete you want to create a local branch to track one of the remote repositories branches | * When it's complete you want to create a local branch to track one of the remote repositories branches | ||
* Right click on the local repository directory and select "Create Branch..." | * Right click on the local repository directory and select "Create Branch..." | ||
| − | [[File:Git-remotebranch- | + | }} |
| + | |||
| + | {{gitdocostep | image=[[File:Git-remotebranch-2.png]] | text= | ||
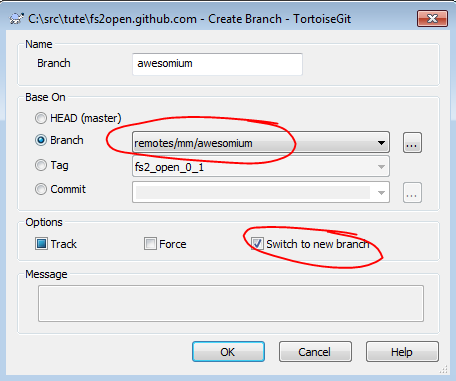
* Set "Base On" -> "Branch" to the remote branch you want to work on | * Set "Base On" -> "Branch" to the remote branch you want to work on | ||
* Check "Switch to new branch" | * Check "Switch to new branch" | ||
* Click "OK" | * Click "OK" | ||
| − | [[File:Git-remotebranch- | + | }} |
| + | |||
| + | {{gitdocostep | image=[[File:Git-remotebranch-3.png]] | text= | ||
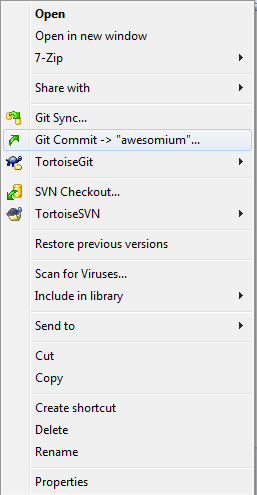
* Write some code! | * Write some code! | ||
* When you're ready to commit, right click on the local repository directory and select "Git Commit -> (branchname)..." | * When you're ready to commit, right click on the local repository directory and select "Git Commit -> (branchname)..." | ||
| − | [[File:Git-remotebranch- | + | }} |
| + | |||
| + | {{gitdocostep | image=[[File:Git-remotebranch-4.png]] | text= | ||
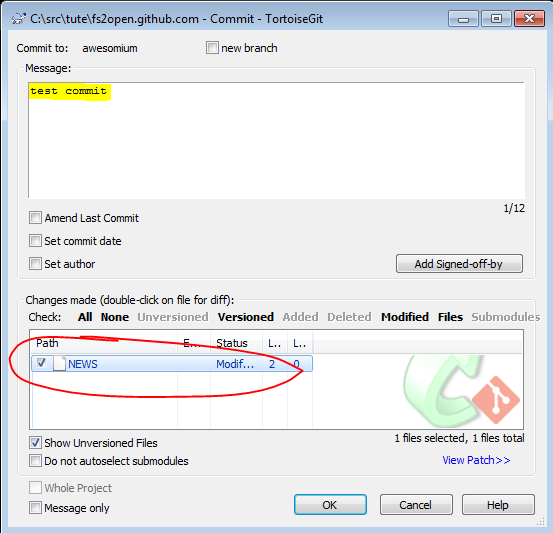
* Enter a commit message | * Enter a commit message | ||
* Review the changes that will make up the commit by double-clicking on files in the list | * Review the changes that will make up the commit by double-clicking on files in the list | ||
| − | [[File:Git-remotebranch- | + | }} |
| + | |||
| + | {{gitdocostep | image=[[File:Git-remotebranch-5.png]] | text= | ||
* When the commit is completed there will be a button to "Push" your branch. | * When the commit is completed there will be a button to "Push" your branch. | ||
| − | * | + | * If this is your first time pulling from the other persons remote, you probably won't have permission to push to it. We'll push to your own remote repository for the time being. |
* Optionally change the remote branch name (e.g. with a reference to the remote it can from) | * Optionally change the remote branch name (e.g. with a reference to the remote it can from) | ||
* Select "Origin" as your "Destination" -> "Remote" | * Select "Origin" as your "Destination" -> "Remote" | ||
* Click "OK" | * Click "OK" | ||
| − | [[File:Git-remotebranch- | + | }} |
| + | |||
| + | {{gitdocostep | image=[[File:Git-remotebranch-6.png]] | text= | ||
* Now you can tell the other person that you've added to their branch and have pushed the changes to your own remote branch | * Now you can tell the other person that you've added to their branch and have pushed the changes to your own remote branch | ||
* They can now follow (most of) the steps above to add your repository as (to them) a remote and fetch/merge your changes into their branch | * They can now follow (most of) the steps above to add your repository as (to them) a remote and fetch/merge your changes into their branch | ||
| Line 164: | Line 388: | ||
* Firstly ensure that you have the branch to want to merge into selected | * Firstly ensure that you have the branch to want to merge into selected | ||
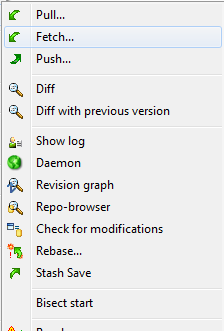
* Right click on the repository directory and select "Fetch..." | * Right click on the repository directory and select "Fetch..." | ||
| − | [[File:Git-remotebranch- | + | }} |
| + | |||
| + | {{gitdocostep | image=[[File:Git-remotebranch-7.png]] | text= | ||
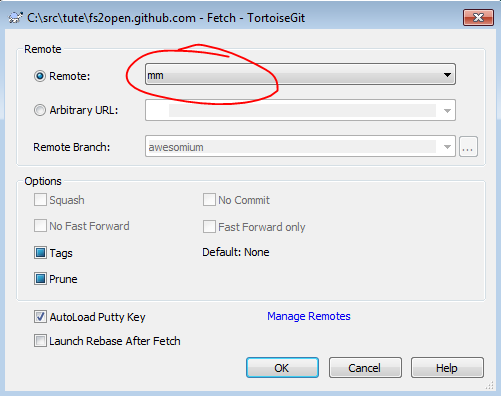
* Select the correct remote repository from the dropdown | * Select the correct remote repository from the dropdown | ||
| − | [[File:Git-remotebranch- | + | }} |
| + | |||
| + | {{gitdocostep | image=[[File:Git-remotebranch-8.png]] | text= | ||
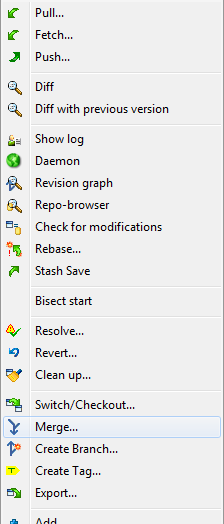
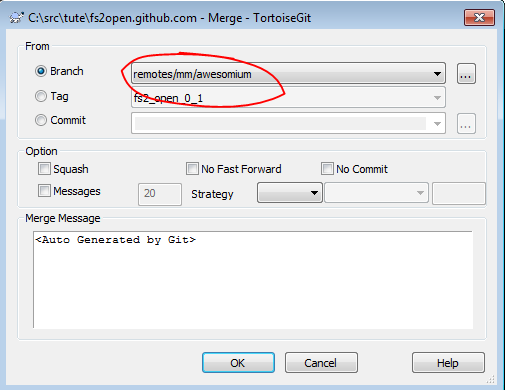
* Right click on the repository directory and select "Merge..." | * Right click on the repository directory and select "Merge..." | ||
| − | [[File:Git-remotebranch- | + | }} |
| + | |||
| + | {{gitdocostep | image=[[File:Git-remotebranch-9.png]] | text= | ||
* Select the correct remote branch to merge from | * Select the correct remote branch to merge from | ||
* Click OK and you're done (assuming there are no merge conflicts of course...) | * Click OK and you're done (assuming there are no merge conflicts of course...) | ||
| − | [[File:Git- | + | }} |
| + | <div style="clear: both"></div> | ||
| + | |||
| + | === Contributing to an Existing Remote Branch === | ||
| + | The steps to contributing to an existing remote branch is the same as in [[Guide_to_FS_Open_and_git#Forking_a_Branch|Forking a Branch]], except when you go to push the branch to your remote, you push to the other person's remote instead. | ||
| + | |||
| + | For this to succeed, however, you must have write permissions in order to do so. On GitHub, this is as easy as having the other person adding your to the repo's collaborators list through Settings > Collaborators. | ||
| + | |||
| + | Once you have write permission, you may push to that remote normally. | ||
| + | |||
| + | This method is recommended for team projects, as it helps keep everyone on the team up-to-date with the rest of the team's progress rather than requiring everyone to constantly pull from everyone else's remote whenever somebody updates. The owner of the project remote would then typically be considered the team lead or chief maintainer of the branch, but anyone on the team still has the option of splitting off and do their own thing on their own repo. | ||
| + | |||
| + | == Patches: TortoiseGit == | ||
| + | |||
| + | (from http://www.hard-light.net/forums/index.php?topic=83453.msg1736781#msg1736781, written by m!m) | ||
| + | |||
| + | === Creating Patches === | ||
| + | |||
| + | {{gitdocostep | image=[[File:Git-patch-1.png]] | text= | ||
| + | Just choose the "Create Patch Serial" from the context menu. | ||
| + | }} | ||
| + | |||
| + | {{gitdocostep | image=[[File:Git-patch-2.png]] | text= | ||
| + | In the window choose from which point onwards the patch should be created, master is probably a good idea. Once you hit OK TGit will create a number of patch files in your repository which you can then transfer to the other repository. | ||
| + | }} | ||
| + | <div style="clear: both"></div> | ||
| + | |||
| + | === Applying patches === | ||
| + | |||
| + | {{gitdocostep | image=[[File:Git-patch-3.png]] | text= | ||
| + | To apply a patch serial choose "Apply Patch Serial". You will need to select the patch files from the previous step and possibly rearrange them (in most cases the default ordering should be sufficient though). | ||
| + | }} | ||
| + | |||
| + | {{gitdocostep | image=[[File:Git-patch-4.png]] | text= | ||
| + | Hit Apply and TGit will start creating commits with the changes in the patch files. | ||
| + | }} | ||
| + | |||
| + | {{gitdocostep | image=[[File:Git-patch-5.png]] | text= | ||
| + | If there are conflicts you will need to resolve or skip them. | ||
| + | }} | ||
| + | |||
| + | When that is finished you will have all the changes from the patches in your repository. | ||
| + | <div style="clear: both"></div> | ||
== Applying old patches plus conflict resolution: TortoiseGit == | == Applying old patches plus conflict resolution: TortoiseGit == | ||
| Line 179: | Line 451: | ||
=== Steps === | === Steps === | ||
| − | {{gitdocostep | image=[[File:Git-conflict-res-1.png | + | {{gitdocostep | image=[[File:Git-conflict-res-1.png]] | text= |
* Before you start, ensure that your master is up to date (perform a Sync / Pull) | * Before you start, ensure that your master is up to date (perform a Sync / Pull) | ||
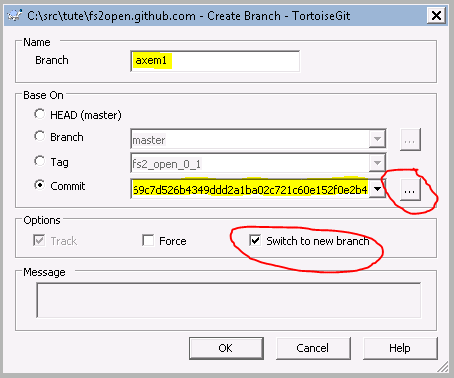
* Start with creating a new branch (i.e. the typical git response when you want to do almost anything! :)) | * Start with creating a new branch (i.e. the typical git response when you want to do almost anything! :)) | ||
| Line 186: | Line 458: | ||
}} | }} | ||
| − | {{gitdocostep | image=[[File:Git-conflict-res-2.png | + | {{gitdocostep | image=[[File:Git-conflict-res-2.png]] | text= |
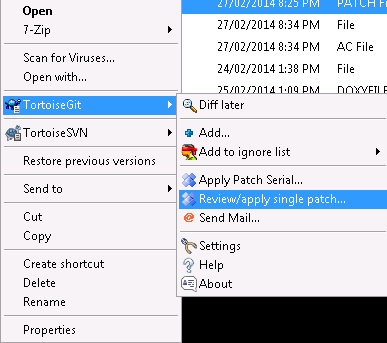
* Save the patch to a file and copy it to somewhere inside the git repository | * Save the patch to a file and copy it to somewhere inside the git repository | ||
** depending on the paths in the patch, the exact location of the patch file *may* matter (I haven't personally tested this) | ** depending on the paths in the patch, the exact location of the patch file *may* matter (I haven't personally tested this) | ||
| Line 192: | Line 464: | ||
}} | }} | ||
| − | {{gitdocostep | image=[[File:Git-conflict-res-3.png | + | {{gitdocostep | image=[[File:Git-conflict-res-3.png]] | text= |
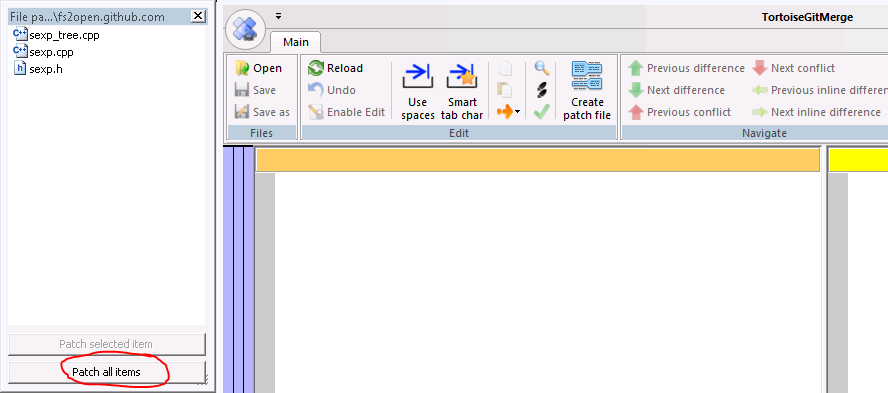
* TortiseGitMerge should start with an extra window displayed | * TortiseGitMerge should start with an extra window displayed | ||
* Click "Patch all items" in the extra window to apply the patch | * Click "Patch all items" in the extra window to apply the patch | ||
| Line 200: | Line 472: | ||
| − | {{gitdocostep | image=[[File:Git-conflict-res-4.png | + | {{gitdocostep | image=[[File:Git-conflict-res-4.png]] | text= |
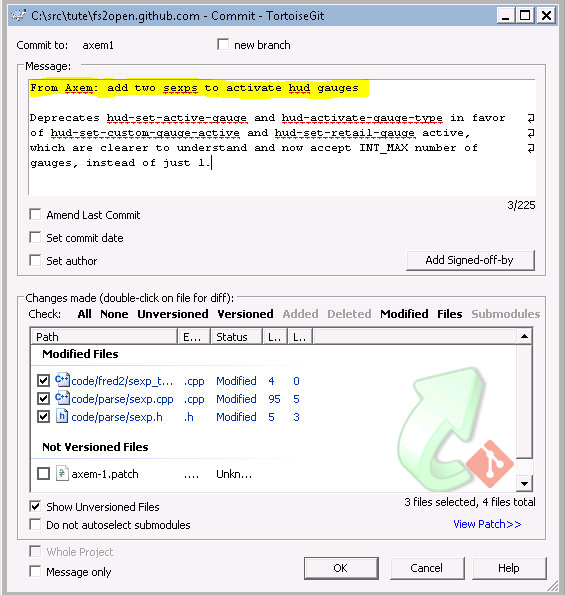
* Next commit the changes to your branch (this is pretty much the normal commit process) | * Next commit the changes to your branch (this is pretty much the normal commit process) | ||
}} | }} | ||
| − | {{gitdocostep | image=[[File:Git-conflict-res-5.png | + | {{gitdocostep | image=[[File:Git-conflict-res-5.png]] | text= |
| − | + | Now we're onto something new - you are going to "rebase" the current master onto your branch. The sequence of steps is basically, remove the patch you applied, then in order apply all the commits from master to your branch, *and then* reapply the patch "on top" of all those changes. This is different to a "merge" which is more like applying all the commits from master "on top" of your current patch | |
| − | |||
| − | |||
{{ Warning| DO NOT EVER perform a rebase on a branch that you have pushed to a public repository. A rebase changes the previously published commit history which will cause pain for anyone else who has started using your published branch. Perform a "merge" instead. Or maybe create a new branch based off your existing branch, then rebase *the new* local branch and push to a *new* public branch. }} | {{ Warning| DO NOT EVER perform a rebase on a branch that you have pushed to a public repository. A rebase changes the previously published commit history which will cause pain for anyone else who has started using your published branch. Perform a "merge" instead. Or maybe create a new branch based off your existing branch, then rebase *the new* local branch and push to a *new* public branch. }} | ||
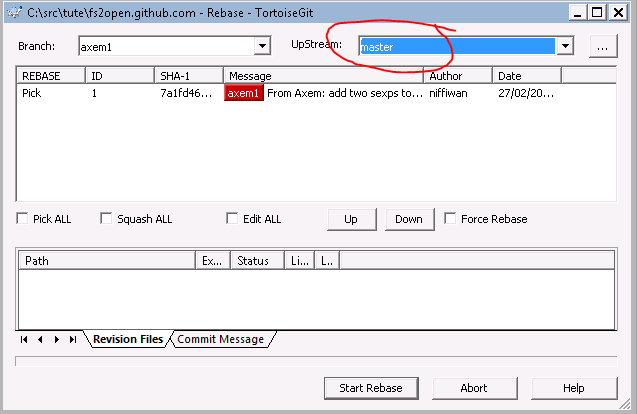
* Right click on the repository directory, select TortoiseGit -> Rebase | * Right click on the repository directory, select TortoiseGit -> Rebase | ||
| Line 214: | Line 484: | ||
}} | }} | ||
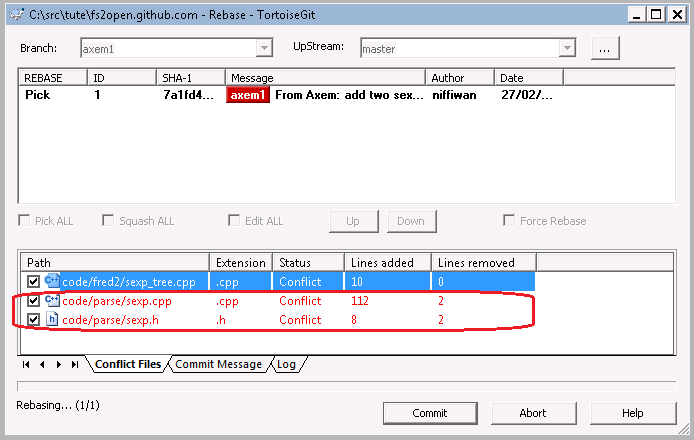
| − | {{gitdocostep | image=[[File:Git-conflict-res-6.png | + | {{gitdocostep | image=[[File:Git-conflict-res-6.png]] | text= |
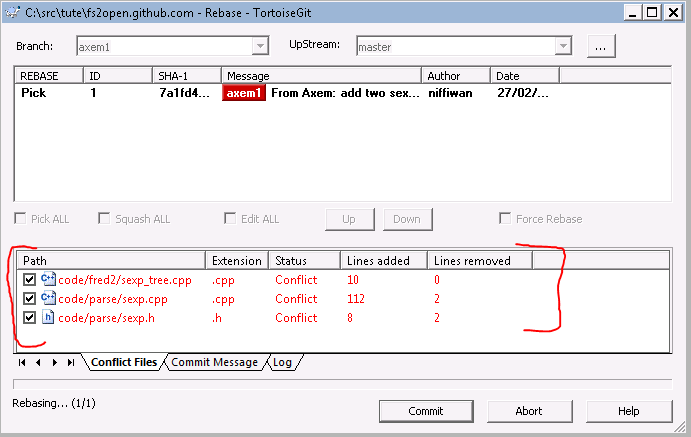
* As expected, the "Rebase" fails due to conflicts | * As expected, the "Rebase" fails due to conflicts | ||
* Check which files failed, then double click on each file to resolve the conflicts | * Check which files failed, then double click on each file to resolve the conflicts | ||
}} | }} | ||
| − | {{gitdocostep | image=[[File:Git-conflict-res-7.png | + | {{gitdocostep | image=[[File:Git-conflict-res-7.png|900px]] | text= |
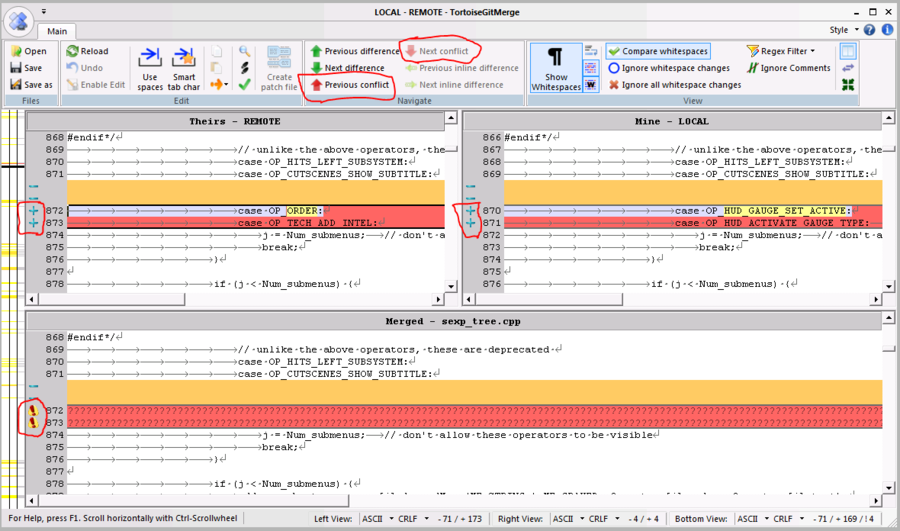
* The TortoiseGitMerge window should open. This a a graphical interface that assists with conflict resolution. | * The TortoiseGitMerge window should open. This a a graphical interface that assists with conflict resolution. | ||
* The three windows show code from: | * The three windows show code from: | ||
| Line 229: | Line 499: | ||
}} | }} | ||
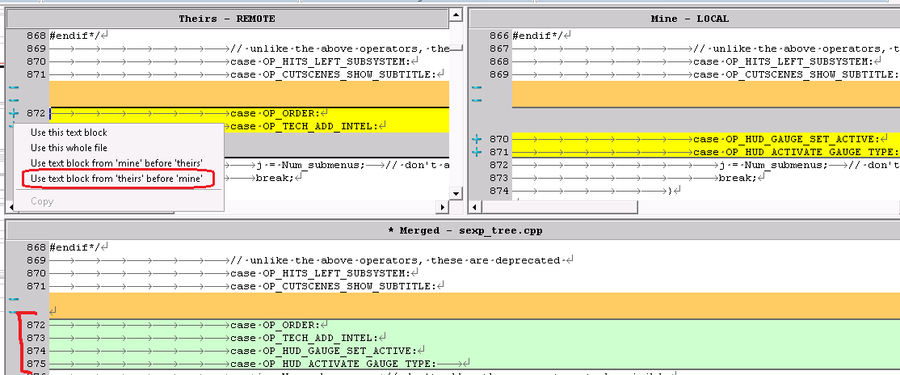
| − | {{gitdocostep | image=[[File:Git-conflict-res-8.png | + | {{gitdocostep | image=[[File:Git-conflict-res-8.png|900px]] | text= |
* The conflict in this file is simple to resolve | * The conflict in this file is simple to resolve | ||
* Right click on the numbers in the "Theirs" window and select "Use text block from 'theirs' before 'mine'" | * Right click on the numbers in the "Theirs" window and select "Use text block from 'theirs' before 'mine'" | ||
| Line 235: | Line 505: | ||
}} | }} | ||
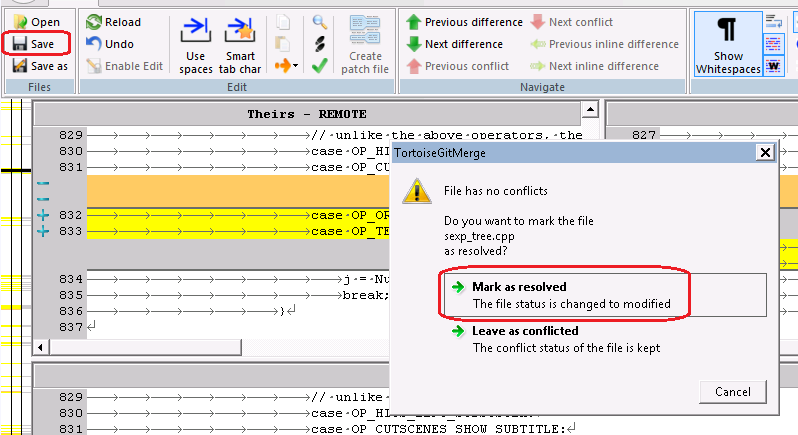
| − | {{gitdocostep | image=[[File:Git-conflict-res-9.png | + | {{gitdocostep | image=[[File:Git-conflict-res-9.png]] | text= |
* That's all for this file, click "Save" then select "Mark as Resolved" | * That's all for this file, click "Save" then select "Mark as Resolved" | ||
}} | }} | ||
| − | {{gitdocostep | image=[[File:Git-conflict-res-10.png | + | {{gitdocostep | image=[[File:Git-conflict-res-10.png]] | text= |
* Close the window, and that's one file down, two to go! (which I'll skip over in this case) | * Close the window, and that's one file down, two to go! (which I'll skip over in this case) | ||
}} | }} | ||
| − | |||
| − | |||
* Once all the files with conflicts are resolved, click "Commit" to complete the process | * Once all the files with conflicts are resolved, click "Commit" to complete the process | ||
| Line 251: | Line 519: | ||
=== TortoiseGitMerge Tips === | === TortoiseGitMerge Tips === | ||
| + | ====Merge Conflict Tips:==== | ||
| + | *The best way to resolve merge conflicts is to avoid them altogether in the first place. This is because it's more likely to induce bugs or unintended behavior whenever manual conflict resolutions come into play. | ||
| + | *Git offers a few conflict resolution strategies. See the Git documentation on "git merge -strategy" to see if one of them can solve most of the conflicts for you. | ||
| + | *Never, Ever, try to resolve the conflicts by writing your own .diff or patch. Use the merge tools available to you. Besides simple "Theirs, Mine" resolutions, most of them allow editing, too. | ||
| + | *If possible, find a merge tool that show you four windows: (unfortunately TGitMerge doesn't do this, only merge tool like this that I've found so far is kdiff3) | ||
| + | ** Your changes | ||
| + | ** Their changes | ||
| + | ** Output / merged results | ||
| + | ** Common ancestor (this is what most tools seem to omit - showing the original code can really clarify what's going on without needing to open another window & find the ancestor yourself) | ||
| + | |||
| + | |||
| + | ===Local Merge Conflicts: Merging branches=== | ||
| + | *If you find that a branch has conflicts when doing a merge, retrieve the commit log for the branch your merging into and save the commit as a unified diff. Use this as a reference during conflict resolutions to ensure you get only the changes that you have made. | ||
| + | *If you find that a branch has conflicts with files that have nothing to do with the changes you made in the commit, you can quickly choose "Solve Conflict Using Theirs" or "Solve Conflict Using Mine" from the commit dialog by right clicking on the file. This will help reduce the number of files you'll have to spot check to just the ones you made changes to. | ||
| + | |||
| + | Lastly, here's a list of some of the tools offered by TortoiseGitMerge which can help with conflict resolution (the list has some overlap with stuff I've already mentioned) | ||
| + | * Right click the line numbers in the "theirs" or "mine" windows to select "text blocks" which will be applied to the "merged" window | ||
| + | * For simple conflicts you can choose "theirs then mine" or vice versa from the right click menu | ||
| + | * By clicking on the line numbers on the left hand side you can select individual lines to apply | ||
| + | * Similarly you can select multiple lines by click/dragging on the line numbers | ||
| + | * When "theirs/mine" lines are selected another right-click option becomes available, "copy". These lines can then be pasted to "merged" | ||
| + | * You can also make edits in the "merged" window just like any other text editor | ||
| + | * Use the "Next/Previous Commit" buttons to rapidly find the conflicts | ||
| + | * Click the "Mark as Resolved" button when you're done. This not only saves your changes/selections, but also clears the conflict flags from the file. If the commit dialog still shows the resolved file as in-conflict, you can right click on the file name and select "Resolved" to mark it as resolved. | ||
| + | |||
| + | |||
| + | ==General Repo Housekeeping== | ||
| + | Doing a full fork of the scp-fs2open codebase will likely leave you with a number of branches that won't be of much interest to you. Thankfully, you can prune off the unwanted/unneeded branches from your fork leaving only the branches you will be working on. Should you decide that you want to see what's going on in any of the other branches (such as antipodes), you can still issue a pull from "upstream". | ||
| − | * | + | *Check out all the branches that you want to work on from origin onto your local machine |
| − | * | + | *In the git console, issue a "git push origin --prune" to start the process. Git may give you a warning message about the push.default setting, you may safely ignore this. |
| − | + | *Check on the status of your pruning using either github's web page or by issuing "git branch -r" to the git console | |
| − | * | ||
| − | |||
| − | |||
| − | |||
| − | |||
| − | |||
Latest revision as of 21:38, 2 September 2018
Contents
Getting the source: Tortoise Git
(based on a previous revision of Getting_the_FreeSpace2:_SCP_Source_Code)
- Download and install Git For Windows (this is a dependency for TortoiseGit)
- Download and install TortoiseGit (you probably need to reboot after installing)
|
|
| Git Command Line Equivalent: N/A; see next step | |
|
|
| Git Command Line Equivalent: git clone https://github.com/scp-fs2open/fs2open.github.com.git | |
Simple Development: Tortoise Git
|
|
| Git Command Line Equivalent: N/A | |
|
|
| Git Command Line Equivalent: N/A | |
|
|
| Git Command Line Equivalent: git clone https://YOUR/FORKS/URL | |
|
|
| Git Command Line Equivalent: git checkout -b BRANCH_NAME master | |
|
|
| Git Command Line Equivalent: git diff | |
|
|
| Git Command Line Equivalent: N/A | |
|
|
| Git Command Line Equivalent: N/A | |
|
|
| Git Command Line Equivalent: git commit -a | |
|
|
| Git Command Line Equivalent: git push origin BRANCH_NAME | |
|
|
| Git Command Line Equivalent: N/A | |
|
|
| Git Command Line Equivalent: N/A | |
|
|
| Git Command Line Equivalent: N/A | |
|
|
| Git Command Line Equivalent: N/A | |
- Note: The previous three steps can be done as a single step if you have recently pushed a branch by selecting the "Compare and Pull Request" button
|
|
| Git Command Line Equivalent: N/A | |
- That's it! Now wait for the pull request to be reviewed and committed to primary FSO master branch
Syncing: Tortoise Git
Pushing
This section will go over synchronizing your local git repo with a remote
|
Once you've committed to your local git repo and verified its integrity (a simple build-check will suffice), you should update the remote repo through the "Push" process.
|
|
| Git Command Line Equivalent: {{{cmdlinetxt}}} | |
|
The Push dialog is displayed. From here, you can push one or more branches from one repo to another, local and remote alike. The "Ref" control group will be the repo that will be pushed onto the repo specified in the "Destination" control group. If you are managing multiple remotes, you may also push one remote to another. For now, we'll focus on just pushing our local repo onto the remote.
If a conflict between the remote repo and your local repo arises, git will halt the push. Otherwise it should complete as shown below. |
|
| Git Command Line Equivalent: {{{cmdlinetxt}}} | |
Pulling
This section will go over pulling commits from an "upstream" remote (assuming that you're developing in a github forked repo and you want to get new commits from the "official" repo)
|
If you don't already have it, add the official repo as a remote called "upstream"
|
|
| Git Command Line Equivalent: {{{cmdlinetxt}}} | |
|
|
| Git Command Line Equivalent: {{{cmdlinetxt}}} | |
|
The defaults in the next screen are fine, click OK to "fetch" all the "upstream" commits |
|
| Git Command Line Equivalent: {{{cmdlinetxt}}} | |
|
Now we "pull" the commits from the upstream master into our own master
|
|
| Git Command Line Equivalent: {{{cmdlinetxt}}} | |
|
|
| Git Command Line Equivalent: {{{cmdlinetxt}}} | |
|
We're back to the previous window. Note how the remote repo and remote branch dropdowns are set to upstream/master
|
|
| Git Command Line Equivalent: {{{cmdlinetxt}}} | |
Resolving Conflicts
This is a simple example of how to resolve a conflict that occurs when you try to push changes to a public repo. This example specifically used:
- A github "personal" repo cloned from another "master" repo
- A branch with conflicting changes; one computer committed changes to a file, while the 2nd computer (running TGit) committed changes to the same lines in that file.
- And yes, the changes are silly
|
Here's the commit from the other computer. |
|
| Git Command Line Equivalent: {{{cmdlinetxt}}} | |
|
Here's the commit in your local repo that you're about to push to the same branch. |
|
| Git Command Line Equivalent: {{{cmdlinetxt}}} | |
|
|
| Git Command Line Equivalent: {{{cmdlinetxt}}} | |
|
As expected that didn't work... |
|
| Git Command Line Equivalent: {{{cmdlinetxt}}} | |
|
As suggested, try a pull with the default options. |
|
| Git Command Line Equivalent: {{{cmdlinetxt}}} | |
|
As expected we have merge conflicts. |
|
| Git Command Line Equivalent: {{{cmdlinetxt}}} | |
|
At this "yes / no" prompt either options can be picked, it'll be a bit quicker to pick "yes" if you want to resolve the conflict now. |
|
| Git Command Line Equivalent: {{{cmdlinetxt}}} | |
|
If you didn't pick yes in the previous step, you can get this window by select "Diff" from the TGit menu
|
|
| Git Command Line Equivalent: {{{cmdlinetxt}}} | |
|
"Resolve the conflict" (often simpler said than done). Some tips are available here. |
|
| Git Command Line Equivalent: {{{cmdlinetxt}}} | |
|
Since this is a trivial example, I've used an equally trivial resolution of taking one line from remote repo and one from the local repo.
|
|
| Git Command Line Equivalent: {{{cmdlinetxt}}} | |
|
A prompt should appear asking if you want to mark the conflict as resolved.
|
|
| Git Command Line Equivalent: {{{cmdlinetxt}}} | |
|
Note that the Diff window hasn't updated, it still says the file has a conflict :/ If you double click on the file however, nothing will happen.
|
|
| Git Command Line Equivalent: {{{cmdlinetxt}}} | |
|
Commit your changes
|
|
| Git Command Line Equivalent: {{{cmdlinetxt}}} | |
|
The commit was successful. |
|
| Git Command Line Equivalent: {{{cmdlinetxt}}} | |
|
Now back to what was originally wanted - push the changes to the remote repo
|
|
| Git Command Line Equivalent: {{{cmdlinetxt}}} | |
|
Success! |
|
| Git Command Line Equivalent: {{{cmdlinetxt}}} | |
Sync changes with upstream
This section will go over synchronizing your local git development branch with the changes made to the official master branch.
Option 1; Rebase (grudgingly *recommended* since most of the SCP seem to prefer this approach) NOTE: This will change all your commit IDs/hashes; you *should ensure* that no one else has used your existing commits before you rebase. What's that? You pushed commits to a public repo? Then:
- you can't ensure that so you're going to make life miserable for anyone that has used your old commits.
- to push again to a public repo you're going to need to use the --force option; *NEVER EVER EVER* use --force on a master branch, you will delete, possibly permanently, someone else's commits (they surely aren't coming back with the same commit IDs... which means _everyone_ probably needs to nuke their fork and start again)
|
Fetch the changes in the official/upstream master branch |
none |
| Git Command Line Equivalent: git fetch upstream master | |
|
Merge those changes with your local master (possibly optional) |
none |
| Git Command Line Equivalent: git checkout master; git merge upstream/master --ff-only | |
|
Rebase the changes onto your local branch directly from master |
none |
| Git Command Line Equivalent: git checkout YOUR_BRANCH; git rebase upstream/master | |
|
Resolve any conflicts (see the relevant section) |
none |
| Git Command Line Equivalent: (see the relevant section) | |
Option 2; Merge
NOTE: This will add extra "merge commits" to your history, and when you create a PR those extra commits will probably end up in the main master branch. Some consider this to be ugly.
|
Fetch the changes in the official/upstream master branch |
none |
| Git Command Line Equivalent: git fetch upstream master | |
|
Merge those changes with your local master (possibly optional) |
none |
| Git Command Line Equivalent: git checkout master; git merge upstream/master --ff-only | |
|
Merge the local master with your branch |
none |
| Git Command Line Equivalent: git checkout YOUR_BRANCH; git merge master | |
|
Resolve any conflicts (see the relevant section) |
none |
| Git Command Line Equivalent: (see the relevant section) | |
Collaboration with remotes: Tortoise Git
Forking a Branch
Here we'll go through:
- adding a remote branch from someone else's repository
- committing to that branch and pushing it back to your own repository
You may do this when you're collaborating on a feature prior to it being committed to the master
|
|
| Git Command Line Equivalent: {{{cmdlinetxt}}} | |
|
|
| Git Command Line Equivalent: {{{cmdlinetxt}}} | |
|
|
| Git Command Line Equivalent: {{{cmdlinetxt}}} | |
|
|
| Git Command Line Equivalent: {{{cmdlinetxt}}} | |
|
|
| Git Command Line Equivalent: {{{cmdlinetxt}}} | |
|
|
| Git Command Line Equivalent: {{{cmdlinetxt}}} | |
|
|
| Git Command Line Equivalent: {{{cmdlinetxt}}} | |
|
|
| Git Command Line Equivalent: {{{cmdlinetxt}}} | |
|
|
| Git Command Line Equivalent: {{{cmdlinetxt}}} | |
|
|
| Git Command Line Equivalent: {{{cmdlinetxt}}} | |
|
|
| Git Command Line Equivalent: {{{cmdlinetxt}}} | |
|
|
| Git Command Line Equivalent: {{{cmdlinetxt}}} | |
|
|
| Git Command Line Equivalent: {{{cmdlinetxt}}} | |
Contributing to an Existing Remote Branch
The steps to contributing to an existing remote branch is the same as in Forking a Branch, except when you go to push the branch to your remote, you push to the other person's remote instead.
For this to succeed, however, you must have write permissions in order to do so. On GitHub, this is as easy as having the other person adding your to the repo's collaborators list through Settings > Collaborators.
Once you have write permission, you may push to that remote normally.
This method is recommended for team projects, as it helps keep everyone on the team up-to-date with the rest of the team's progress rather than requiring everyone to constantly pull from everyone else's remote whenever somebody updates. The owner of the project remote would then typically be considered the team lead or chief maintainer of the branch, but anyone on the team still has the option of splitting off and do their own thing on their own repo.
Patches: TortoiseGit
(from http://www.hard-light.net/forums/index.php?topic=83453.msg1736781#msg1736781, written by m!m)
Creating Patches
|
Just choose the "Create Patch Serial" from the context menu. |
|
| Git Command Line Equivalent: {{{cmdlinetxt}}} | |
|
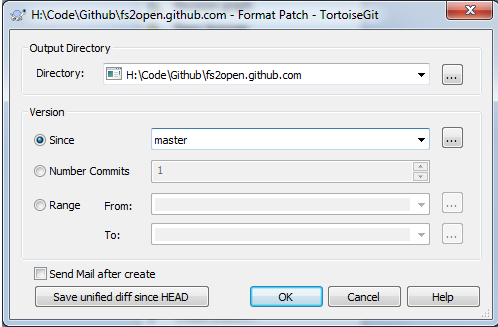
In the window choose from which point onwards the patch should be created, master is probably a good idea. Once you hit OK TGit will create a number of patch files in your repository which you can then transfer to the other repository. |
|
| Git Command Line Equivalent: {{{cmdlinetxt}}} | |
Applying patches
|
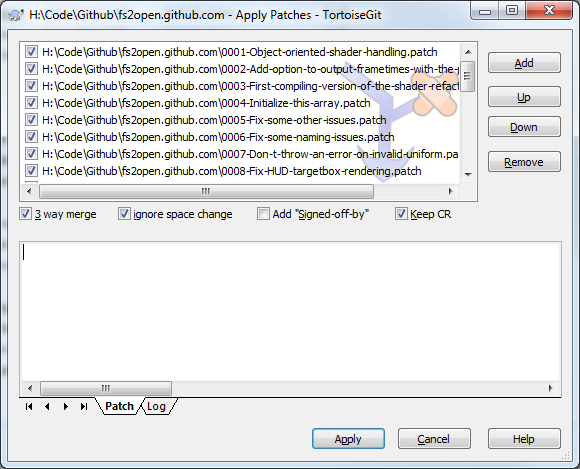
To apply a patch serial choose "Apply Patch Serial". You will need to select the patch files from the previous step and possibly rearrange them (in most cases the default ordering should be sufficient though). |
|
| Git Command Line Equivalent: {{{cmdlinetxt}}} | |
|
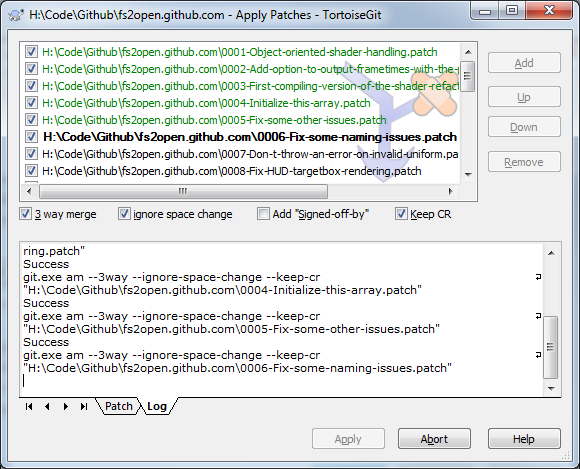
Hit Apply and TGit will start creating commits with the changes in the patch files. |
|
| Git Command Line Equivalent: {{{cmdlinetxt}}} | |
|
If there are conflicts you will need to resolve or skip them. |
|
| Git Command Line Equivalent: {{{cmdlinetxt}}} | |
When that is finished you will have all the changes from the patches in your repository.
Applying old patches plus conflict resolution: TortoiseGit
Here's one way to apply old patches using git. When I say "old patch", I mean a patch that you almost certainly know is going to have conflicts. This is based off a technique I've used with the git command line. It may be that TortoiseGit provides alternate ways of achieving this, however the advantage of this technique is that it's very similar to the conflict resolution that you may need to do when syncing your repo (plus I have a good example in one of Axem's patches that's been floating around for... nearly 2.5 years!) And I really hate dealing with .rej files, I find the graphical tools used in this method make conflict resolution much easier (of course YMMV depending on your experience/preference!)
Steps
|
|
| Git Command Line Equivalent: {{{cmdlinetxt}}} | |
|
|
| Git Command Line Equivalent: {{{cmdlinetxt}}} | |
|
|
| Git Command Line Equivalent: {{{cmdlinetxt}}} | |
|
|
| Git Command Line Equivalent: {{{cmdlinetxt}}} | |
|
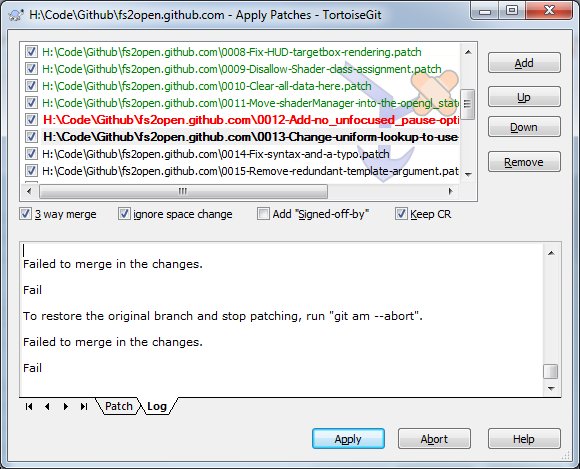
Now we're onto something new - you are going to "rebase" the current master onto your branch. The sequence of steps is basically, remove the patch you applied, then in order apply all the commits from master to your branch, *and then* reapply the patch "on top" of all those changes. This is different to a "merge" which is more like applying all the commits from master "on top" of your current patch Warning: DO NOT EVER perform a rebase on a branch that you have pushed to a public repository. A rebase changes the previously published commit history which will cause pain for anyone else who has started using your published branch. Perform a "merge" instead. Or maybe create a new branch based off your existing branch, then rebase *the new* local branch and push to a *new* public branch.
|
|
| Git Command Line Equivalent: {{{cmdlinetxt}}} | |
|
|
| Git Command Line Equivalent: {{{cmdlinetxt}}} | |
|
|
| Git Command Line Equivalent: {{{cmdlinetxt}}} | |
|
|
| Git Command Line Equivalent: {{{cmdlinetxt}}} | |
|
|
| Git Command Line Equivalent: {{{cmdlinetxt}}} | |
|
|
| Git Command Line Equivalent: {{{cmdlinetxt}}} | |
- Once all the files with conflicts are resolved, click "Commit" to complete the process
- TortoiseGit -> Show Log is very useful to double check that you got the commit right before pushing it to a public repo
- If you didn't get it right, edit the files in your normal IDE to fix the mistakes, make another commit and "squash" the two commits together before pushing to a public repository
- As a last resort if the rebase is beyond saving, simply delete the branch and start again
TortoiseGitMerge Tips
Merge Conflict Tips:
- The best way to resolve merge conflicts is to avoid them altogether in the first place. This is because it's more likely to induce bugs or unintended behavior whenever manual conflict resolutions come into play.
- Git offers a few conflict resolution strategies. See the Git documentation on "git merge -strategy" to see if one of them can solve most of the conflicts for you.
- Never, Ever, try to resolve the conflicts by writing your own .diff or patch. Use the merge tools available to you. Besides simple "Theirs, Mine" resolutions, most of them allow editing, too.
- If possible, find a merge tool that show you four windows: (unfortunately TGitMerge doesn't do this, only merge tool like this that I've found so far is kdiff3)
- Your changes
- Their changes
- Output / merged results
- Common ancestor (this is what most tools seem to omit - showing the original code can really clarify what's going on without needing to open another window & find the ancestor yourself)
Local Merge Conflicts: Merging branches
- If you find that a branch has conflicts when doing a merge, retrieve the commit log for the branch your merging into and save the commit as a unified diff. Use this as a reference during conflict resolutions to ensure you get only the changes that you have made.
- If you find that a branch has conflicts with files that have nothing to do with the changes you made in the commit, you can quickly choose "Solve Conflict Using Theirs" or "Solve Conflict Using Mine" from the commit dialog by right clicking on the file. This will help reduce the number of files you'll have to spot check to just the ones you made changes to.
Lastly, here's a list of some of the tools offered by TortoiseGitMerge which can help with conflict resolution (the list has some overlap with stuff I've already mentioned)
- Right click the line numbers in the "theirs" or "mine" windows to select "text blocks" which will be applied to the "merged" window
- For simple conflicts you can choose "theirs then mine" or vice versa from the right click menu
- By clicking on the line numbers on the left hand side you can select individual lines to apply
- Similarly you can select multiple lines by click/dragging on the line numbers
- When "theirs/mine" lines are selected another right-click option becomes available, "copy". These lines can then be pasted to "merged"
- You can also make edits in the "merged" window just like any other text editor
- Use the "Next/Previous Commit" buttons to rapidly find the conflicts
- Click the "Mark as Resolved" button when you're done. This not only saves your changes/selections, but also clears the conflict flags from the file. If the commit dialog still shows the resolved file as in-conflict, you can right click on the file name and select "Resolved" to mark it as resolved.
General Repo Housekeeping
Doing a full fork of the scp-fs2open codebase will likely leave you with a number of branches that won't be of much interest to you. Thankfully, you can prune off the unwanted/unneeded branches from your fork leaving only the branches you will be working on. Should you decide that you want to see what's going on in any of the other branches (such as antipodes), you can still issue a pull from "upstream".
- Check out all the branches that you want to work on from origin onto your local machine
- In the git console, issue a "git push origin --prune" to start the process. Git may give you a warning message about the push.default setting, you may safely ignore this.
- Check on the status of your pruning using either github's web page or by issuing "git branch -r" to the git console
