Difference between revisions of "Cutscenes tutorial (basic)"
m |
m (→Preplanning: grammatical correction) |
||
| (7 intermediate revisions by 2 users not shown) | |||
| Line 1: | Line 1: | ||
{{grammar}} | {{grammar}} | ||
| − | + | Making cutscenes is no longer restricted to animators. It is also possible with FRED_Open. | |
| − | This article will presuppose a rudimentary understanding of FreeSpace mission making. | + | This article will presuppose a rudimentary understanding of FreeSpace mission making. Beginning [[FREDder]]s might find making cutscenes difficult. |
==Basics== | ==Basics== | ||
| − | In-mission cutscenes are real time and not as restricted as the ones made with an animation program. If the FREDder uses the "set-camera position" SEXP, the camera will assume a given position, but it will not protect the player's ship in any way. If the player is killed during the cutscene, the mission will end as normal, ending your cutscene. A recommended way of doing cutscenes is to place the player's start position far away from the battlefield, and practice some other precautions (protect-ship, ship-invulnerable, etc). | + | In-mission cutscenes are real-time and not as restricted as the ones made with an animation program. If the FREDder uses the "set-camera position" SEXP, the camera will assume a given position, but it will not protect the player's ship in any way. If the player is killed during the cutscene, the mission will end as normal, ending your cutscene. A recommended way of doing cutscenes is to place the player's start position far away from the battlefield, and practice some other precautions (protect-ship, ship-invulnerable, etc). |
| − | + | Like normal missions, the player has no control over other ships. When you made sure that the player is safe, ensuring that the mission will not end prematurely because of the player's death, you have to manipulate the outcome. | |
You may end the cutscene by ending the mission ([[end-mission]], [[force-jump]]) or resetting the camera ([[reset-camera]]). | You may end the cutscene by ending the mission ([[end-mission]], [[force-jump]]) or resetting the camera ([[reset-camera]]). | ||
| Line 14: | Line 14: | ||
==Making the actual cutscene== | ==Making the actual cutscene== | ||
===Preplanning=== | ===Preplanning=== | ||
| − | Before firing up [[Portal:FRED|FRED]], you must have an outline of what you want to happen in your cutscene. It is up to you how you | + | Before firing up [[Portal:FRED|FRED]], you must have an outline of what you want to happen in your cutscene. It is up to you how you do the planning. Keep in mind, however, that not everything you imagine is possible. A lot of other elements will have to be changed later on, so make your plan flexible and try not to get into too much detail. |
The screenplay we are going to use in this tutorial is the following: | The screenplay we are going to use in this tutorial is the following: | ||
| − | Set cutscene bars | + | Set cutscene bars |
Subtitle: GNG Base is under attack | Subtitle: GNG Base is under attack | ||
A battle is raging around an Arcadia installation. [Camera looks at the Arcadia] | A battle is raging around an Arcadia installation. [Camera looks at the Arcadia] | ||
| − | A group of hostiles attack an | + | A group of hostiles attack an evacuating transport, guarded by some Alliance ships. [Camera follows the evacuation transport] |
| − | When the | + | When the transport is destroyed or escapes, a Ravana will jump in and start attacking the station. [Camera looks at the Ravana] |
Subtitle: No one was left on board | Subtitle: No one was left on board | ||
| − | The Ravana destroys the station | + | The Ravana destroys the station |
| − | The GTVA survivors are jumping out | + | The GTVA survivors are jumping out [Camera looks at them] |
Note that this is a rough outline of it. Details like how many ships are attacking, when, and from what direction must not be in such an outline. | Note that this is a rough outline of it. Details like how many ships are attacking, when, and from what direction must not be in such an outline. | ||
===Creating the mission=== | ===Creating the mission=== | ||
| − | The first step is to set up the mission. Make sure that everything you want happens in the mission | + | The first step is to set up the mission. Make sure that everything you want happens in the mission (dogfights, a Ravana jumps in and destroys the station, and survivors who are ordered to jump out). As soon as you figure how the mission plays out and the outcome is always as intended, you can start making the cutscene. |
You will have to run the mission many times until you get what you want. To speed up your testing time, tick "No Briefing" and "No Debriefing" in the Mission Specs Editor (SHIFT-N). | You will have to run the mission many times until you get what you want. To speed up your testing time, tick "No Briefing" and "No Debriefing" in the Mission Specs Editor (SHIFT-N). | ||
| Line 39: | Line 39: | ||
Now is the time to make the cutscene. We will go step by step. As soon as you are satisfied with one stage, proceed to the next. Test frequently. The first three lines of our screenplay read like this: | Now is the time to make the cutscene. We will go step by step. As soon as you are satisfied with one stage, proceed to the next. Test frequently. The first three lines of our screenplay read like this: | ||
| − | Set cutscene bars | + | Set cutscene bars |
Subtitle: GNG Base is under attack | Subtitle: GNG Base is under attack | ||
A battle is raging around an Arcadia installation. [Camera looks at the Arcadia] | A battle is raging around an Arcadia installation. [Camera looks at the Arcadia] | ||
| Line 45: | Line 45: | ||
Setting cutscene bars is done by the set-cutscene-bars SEXP. | Setting cutscene bars is done by the set-cutscene-bars SEXP. | ||
| − | Making subtitles is easy. Use the [[show-subtitle]] SEXP, set the first two values to 50, enter the text you want to display (no more than a few words) and set the duration to be displayed in milliseconds | + | Making subtitles is easy. Use the [[show-subtitle]] SEXP, set the first two values to 50, enter the text you want to display (no more than a few words) and set the duration to be displayed in milliseconds. |
| + | |||
| + | [[image:CutTut4.jpg]] | ||
| − | We already have a battle going on around the installation, so setting up the camera in the right position is our only job at the moment. Since FRED does not have a sophisticated and flexible "camera object," you must give coordinates to tell where you want your camera to be placed. There are two ways to do that, but we will only utilize the one that is simpler | + | We already have a battle going on around the installation, so setting up the camera in the right position is our only job at the moment. Since FRED does not have a sophisticated and flexible "camera object," you must give coordinates to tell where you want your camera to be placed. There are two ways to do that, but we will only utilize the one that is simpler (see images below). The first is to use the numbers in FRED's top-right corner. Those are the coordinates of the "camera" with which you are navigating in FRED. Tell FRED to view ship outlines (View -- Ship Outlines; SHIFT-ALT-O) or ship models (not recommended for performance reasons). Hover it over the Arcadia and as soon as you have set up your camera position, open the Mission Event Edit window and use the [[set-camera-position]] SEXP to set your real camera's position. Use the [[set-camera-facing-object]] SEXP to set the heading of your camera. Make it face the Arcadia, and make sure that the battle that is raging around it is visible. |
[[image:CutTut1.jpg]] | [[image:CutTut1.jpg]] | ||
| Line 56: | Line 58: | ||
A group of hostiles attack an evacuation transport, which is under guard by some Alliance ships. [Camera follows the evacuation transport] | A group of hostiles attack an evacuation transport, which is under guard by some Alliance ships. [Camera follows the evacuation transport] | ||
| − | It is | + | It is not important for the transport to survive. Our focus is to show some sort of battle around a transport. Set a camera position in which you can see the transport and set its heading again (it should be facing the transport). This stage is more difficult than the first one because of two reasons: a) the transport is moving and b) the camera must follow the transport. You must set up a camera position that is somewhere between the transport's arrival and departure point. Then, command your camera to follow the transport. Doing the latter can be done by using a set-camera-facing with a Repeat Count of 10000 and an Interval time of 0. This will ensure that the camera will continuously be facing the transport. Setting Interval time to 1 or more will stagger the camera (see [http://www.hard-light.net/wiki/index.php/Image:CutTut3.jpg image] if you are uncertain about something). |
| − | When the | + | When the transport is destroyed or escapes, a Ravana will jump in and start attacking the station. [Camera looks at the Ravana] |
Subtitle: No one was left on board | Subtitle: No one was left on board | ||
| − | The Ravana destroys the station | + | The Ravana destroys the station |
| − | The third stage is initiated as soon as the | + | The third stage is initiated as soon as the transport is destroyed or departed. Set up a SEXP tree with (destroyed-or-departed-delay "transport") and assume another camera position. This time, the camera doesn't need to follow the Ravana. The tricky part is that the previous Event that set the previous camera position is set to trigger almost infinitely, so we must use the following SEXP tree to ensure that the third camera position will not be overwritten by the looping second. Open the Event that sets the second camera position and complement it in the following way: |
[[Image:CutTut3.jpg|thumb|left|This SEXP will follow the evac transport]] | [[Image:CutTut3.jpg|thumb|left|This SEXP will follow the evac transport]] | ||
| Line 79: | Line 81: | ||
[[Image:CutTut4.jpg|thumb|right|Image 4: Start point]] | [[Image:CutTut4.jpg|thumb|right|Image 4: Start point]] | ||
| − | *You can change the screenplay however you want. It is the technical part that is important. You have | + | *You can change the screenplay however you want. It is the technical part that is important. You should have learned how to do the following after completing this tutorial: |
**what kind of cutscenes you can do with FRED. | **what kind of cutscenes you can do with FRED. | ||
**making subtitles | **making subtitles | ||
| Line 86: | Line 88: | ||
**splitting a cutscene into multiple related stages. | **splitting a cutscene into multiple related stages. | ||
**creating a fairly enjoyable cutscene. | **creating a fairly enjoyable cutscene. | ||
| − | *We are using FRED to determine our cameras' positions. If you are after your first test runs, you have noticed that this is not the most precise way of doing it (See images 1 and 2 again). If you want your camera to be placed with extreme precision, run the game using the -pos [[Command-Line Reference|command line]]. The reason why | + | *We are using FRED to determine our cameras' positions. If you are after your first test runs, you have noticed that this is not the most precise way of doing it (See images 1 and 2 again). If you want your camera to be placed with extreme precision, run the game using the -pos [[Command-Line Reference|command line]]. The reason why the author chose this FRED method is because it is better for a tutorial where our camera positions don't need to be exact. |
*Connecting stages with [[has-time-elapsed]] is not the most flexible method. If you want to insert a stage, it will delay the other stages. It is better to use is-event-true or is-destroyed-or-departed-delay. | *Connecting stages with [[has-time-elapsed]] is not the most flexible method. If you want to insert a stage, it will delay the other stages. It is better to use is-event-true or is-destroyed-or-departed-delay. | ||
*Ship names aren't very important for this sort of cutscenes. | *Ship names aren't very important for this sort of cutscenes. | ||
*Use [[ship-invulnerable]], Protect Ship, or [[self-destruct]] if needed. The viewer will not notice these tricks, and it will prevent the unexpected from happening. A well-timed self-destruct is more predictable. | *Use [[ship-invulnerable]], Protect Ship, or [[self-destruct]] if needed. The viewer will not notice these tricks, and it will prevent the unexpected from happening. A well-timed self-destruct is more predictable. | ||
| − | *Even if you think you have finalized the last stage, test the whole cutscene as | + | *Even if you think you have finalized the last stage, test the whole cutscene as often as you needed to ensure the outcome being the same. |
| − | |||
| − | |||
| − | |||
[[Category:FRED Examples]] | [[Category:FRED Examples]] | ||
Latest revision as of 00:23, 22 April 2010
- This article requires proofreading by native speakers of English
Making cutscenes is no longer restricted to animators. It is also possible with FRED_Open.
This article will presuppose a rudimentary understanding of FreeSpace mission making. Beginning FREDders might find making cutscenes difficult.
Contents
Basics
In-mission cutscenes are real-time and not as restricted as the ones made with an animation program. If the FREDder uses the "set-camera position" SEXP, the camera will assume a given position, but it will not protect the player's ship in any way. If the player is killed during the cutscene, the mission will end as normal, ending your cutscene. A recommended way of doing cutscenes is to place the player's start position far away from the battlefield, and practice some other precautions (protect-ship, ship-invulnerable, etc).
Like normal missions, the player has no control over other ships. When you made sure that the player is safe, ensuring that the mission will not end prematurely because of the player's death, you have to manipulate the outcome.
You may end the cutscene by ending the mission (end-mission, force-jump) or resetting the camera (reset-camera).
Making the actual cutscene
Preplanning
Before firing up FRED, you must have an outline of what you want to happen in your cutscene. It is up to you how you do the planning. Keep in mind, however, that not everything you imagine is possible. A lot of other elements will have to be changed later on, so make your plan flexible and try not to get into too much detail.
The screenplay we are going to use in this tutorial is the following:
Set cutscene bars
Subtitle: GNG Base is under attack
A battle is raging around an Arcadia installation. [Camera looks at the Arcadia]
A group of hostiles attack an evacuating transport, guarded by some Alliance ships. [Camera follows the evacuation transport]
When the transport is destroyed or escapes, a Ravana will jump in and start attacking the station. [Camera looks at the Ravana]
Subtitle: No one was left on board
The Ravana destroys the station
The GTVA survivors are jumping out [Camera looks at them]
Note that this is a rough outline of it. Details like how many ships are attacking, when, and from what direction must not be in such an outline.
Creating the mission
The first step is to set up the mission. Make sure that everything you want happens in the mission (dogfights, a Ravana jumps in and destroys the station, and survivors who are ordered to jump out). As soon as you figure how the mission plays out and the outcome is always as intended, you can start making the cutscene.
You will have to run the mission many times until you get what you want. To speed up your testing time, tick "No Briefing" and "No Debriefing" in the Mission Specs Editor (SHIFT-N).
Step-by-step
Before we take a look at our screenplay, we must first ensure the player's safety. A simple way to do that is to drag the player's start point (Alpha 1) far, far away. Also use the Protect Ship feature in Ship Editor -- Misc, if you haven't done that already. This will ensure that no enemy fighter will start approaching the player's ship. Optionally, you can make the player invulnerable (Invulnerable feature in Ship Editor -- Misc) to absolutely ensure that the player will not die.
Now is the time to make the cutscene. We will go step by step. As soon as you are satisfied with one stage, proceed to the next. Test frequently. The first three lines of our screenplay read like this:
Set cutscene bars
Subtitle: GNG Base is under attack
A battle is raging around an Arcadia installation. [Camera looks at the Arcadia]
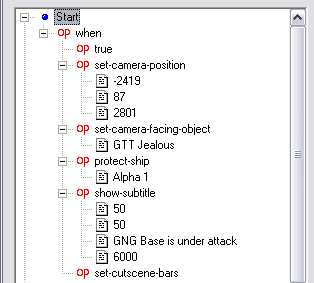
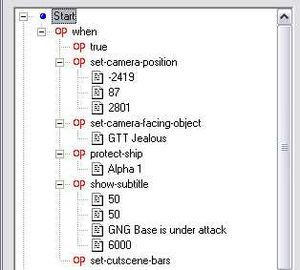
Setting cutscene bars is done by the set-cutscene-bars SEXP.
Making subtitles is easy. Use the show-subtitle SEXP, set the first two values to 50, enter the text you want to display (no more than a few words) and set the duration to be displayed in milliseconds.
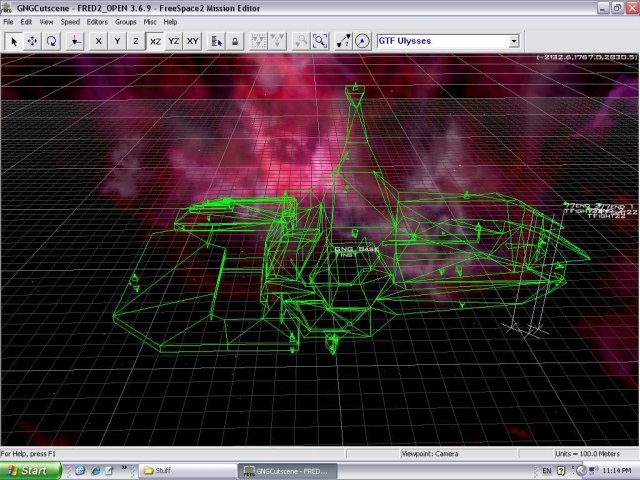
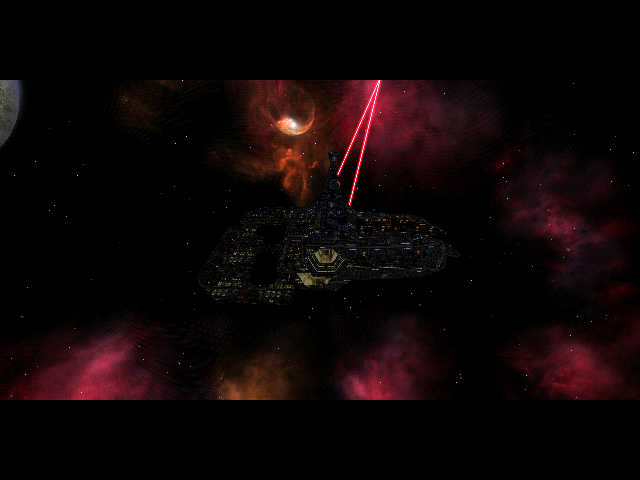
We already have a battle going on around the installation, so setting up the camera in the right position is our only job at the moment. Since FRED does not have a sophisticated and flexible "camera object," you must give coordinates to tell where you want your camera to be placed. There are two ways to do that, but we will only utilize the one that is simpler (see images below). The first is to use the numbers in FRED's top-right corner. Those are the coordinates of the "camera" with which you are navigating in FRED. Tell FRED to view ship outlines (View -- Ship Outlines; SHIFT-ALT-O) or ship models (not recommended for performance reasons). Hover it over the Arcadia and as soon as you have set up your camera position, open the Mission Event Edit window and use the set-camera-position SEXP to set your real camera's position. Use the set-camera-facing-object SEXP to set the heading of your camera. Make it face the Arcadia, and make sure that the battle that is raging around it is visible.
- Image 1: Setting this camera position in FRED...
- Image 2: ...assumes this position ingame.
A group of hostiles attack an evacuation transport, which is under guard by some Alliance ships. [Camera follows the evacuation transport]
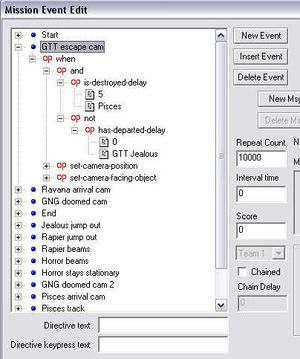
It is not important for the transport to survive. Our focus is to show some sort of battle around a transport. Set a camera position in which you can see the transport and set its heading again (it should be facing the transport). This stage is more difficult than the first one because of two reasons: a) the transport is moving and b) the camera must follow the transport. You must set up a camera position that is somewhere between the transport's arrival and departure point. Then, command your camera to follow the transport. Doing the latter can be done by using a set-camera-facing with a Repeat Count of 10000 and an Interval time of 0. This will ensure that the camera will continuously be facing the transport. Setting Interval time to 1 or more will stagger the camera (see image if you are uncertain about something).
When the transport is destroyed or escapes, a Ravana will jump in and start attacking the station. [Camera looks at the Ravana]
Subtitle: No one was left on board
The Ravana destroys the station
The third stage is initiated as soon as the transport is destroyed or departed. Set up a SEXP tree with (destroyed-or-departed-delay "transport") and assume another camera position. This time, the camera doesn't need to follow the Ravana. The tricky part is that the previous Event that set the previous camera position is set to trigger almost infinitely, so we must use the following SEXP tree to ensure that the third camera position will not be overwritten by the looping second. Open the Event that sets the second camera position and complement it in the following way:
This will stop the Event from triggering when the transport has entered subspace. It may be advised to change the has-departed-delay to destroyed-or-departed-delay if the transport in your version is ever threatened.
Create the Event that will set the third camera's position. This stage isn't technically difficult. The Ravana will likely vaporize the Arcadia very quickly.
The GTVA survivors are jumping out. [Camera looks at them]
Again, you must assume a new camera position. Show some Terran fighters jumping out and it will be fine. Since the first stage battle's outcome vary greatly every time the cutscene is viewed, it is safest to use ship-vanish to make all the fighter participants disappear. Then place some more GTVA fighters who appear some seconds before this stage is initiated. Use Ship Editor -- Arrival cues. Tick No Warp Effect and No Arrival Music and No Arrival Message. Order this wing to do waypoints and jump out after a while. Set the camera's position somewhere around the fighters' departure point. Setting this camera's position is the most difficult because it will have to be facing small mobile targets.
End your mission by end-mission when you think it is appropriate.
Notes
- You can change the screenplay however you want. It is the technical part that is important. You should have learned how to do the following after completing this tutorial:
- what kind of cutscenes you can do with FRED.
- making subtitles
- setting camera positions.
- setting cameras that a) face an object, b) follow a mobile object.
- splitting a cutscene into multiple related stages.
- creating a fairly enjoyable cutscene.
- We are using FRED to determine our cameras' positions. If you are after your first test runs, you have noticed that this is not the most precise way of doing it (See images 1 and 2 again). If you want your camera to be placed with extreme precision, run the game using the -pos command line. The reason why the author chose this FRED method is because it is better for a tutorial where our camera positions don't need to be exact.
- Connecting stages with has-time-elapsed is not the most flexible method. If you want to insert a stage, it will delay the other stages. It is better to use is-event-true or is-destroyed-or-departed-delay.
- Ship names aren't very important for this sort of cutscenes.
- Use ship-invulnerable, Protect Ship, or self-destruct if needed. The viewer will not notice these tricks, and it will prevent the unexpected from happening. A well-timed self-destruct is more predictable.
- Even if you think you have finalized the last stage, test the whole cutscene as often as you needed to ensure the outcome being the same.
